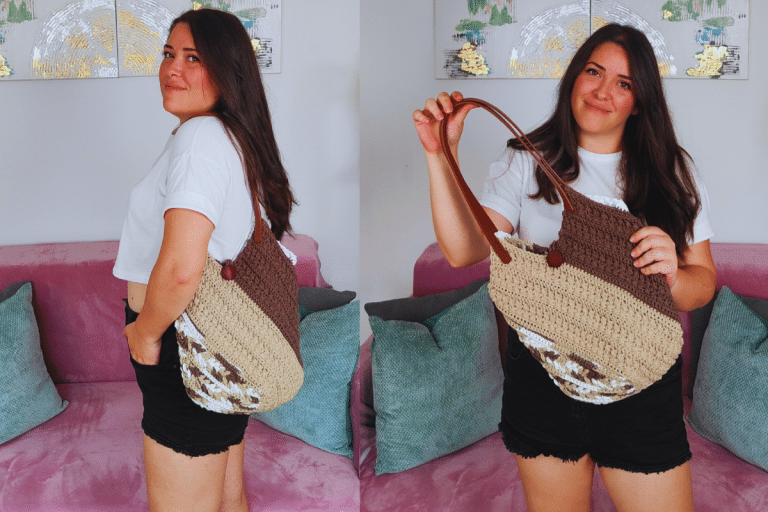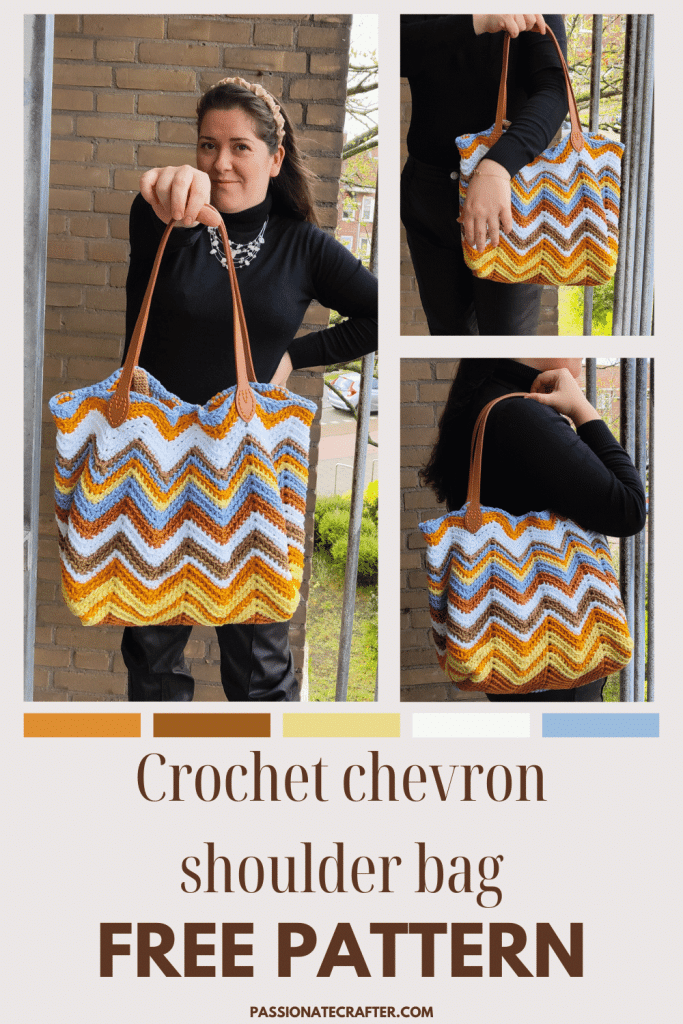
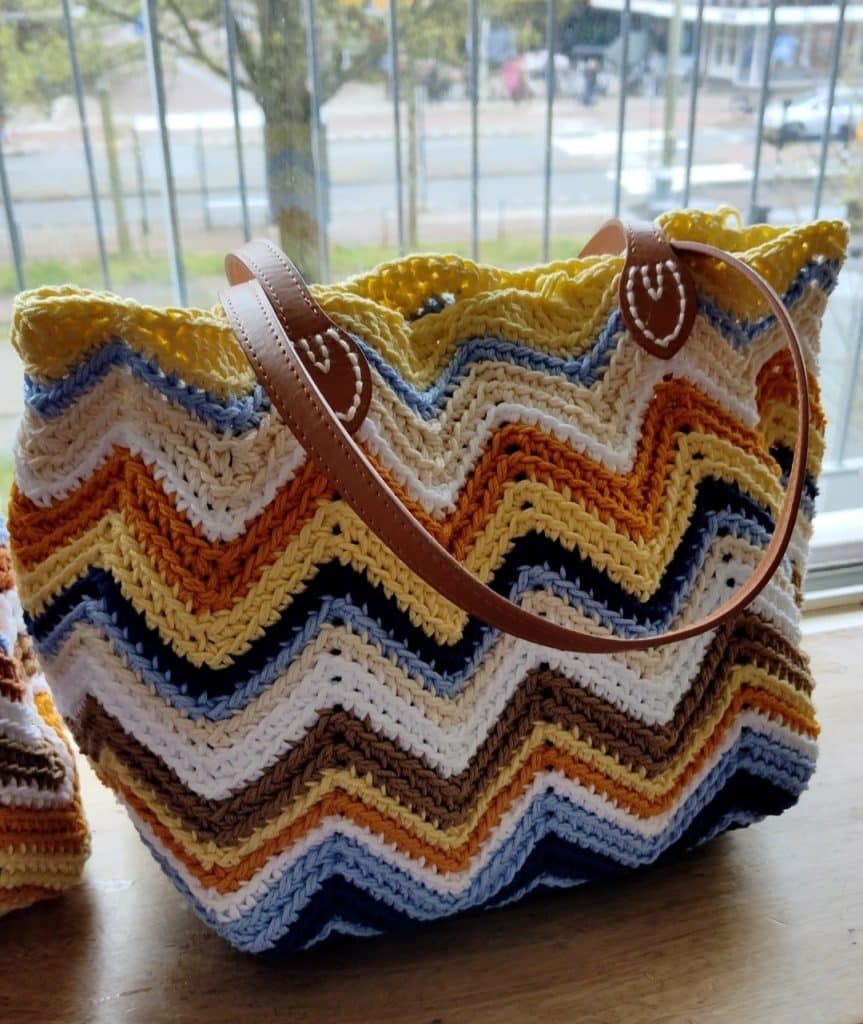
Crochet stylish chevron shoulder bag that is both trendy and versatile. Whether heading out for a casual outing or attending a more formal event, this chevron shoulder bag is the perfect accessory to elevate your style.
With its eye-catching chevron pattern and versatile design, it’s sure to become a staple in your accessory collection. Scroll down for the free pattern, or buy the ad-free, printable PDF HERE.

The chevron shoulder bag offers a trendy, modern look that is perfect for any occasion.
The chevron pattern adds a playful twist to the classic shoulder bag design, making it a fashionable and fun addition to any outfit. Whether you’re out for a casual coffee run or attending a craft fair, this bag will turn heads and spark conversations about your handmade creation.
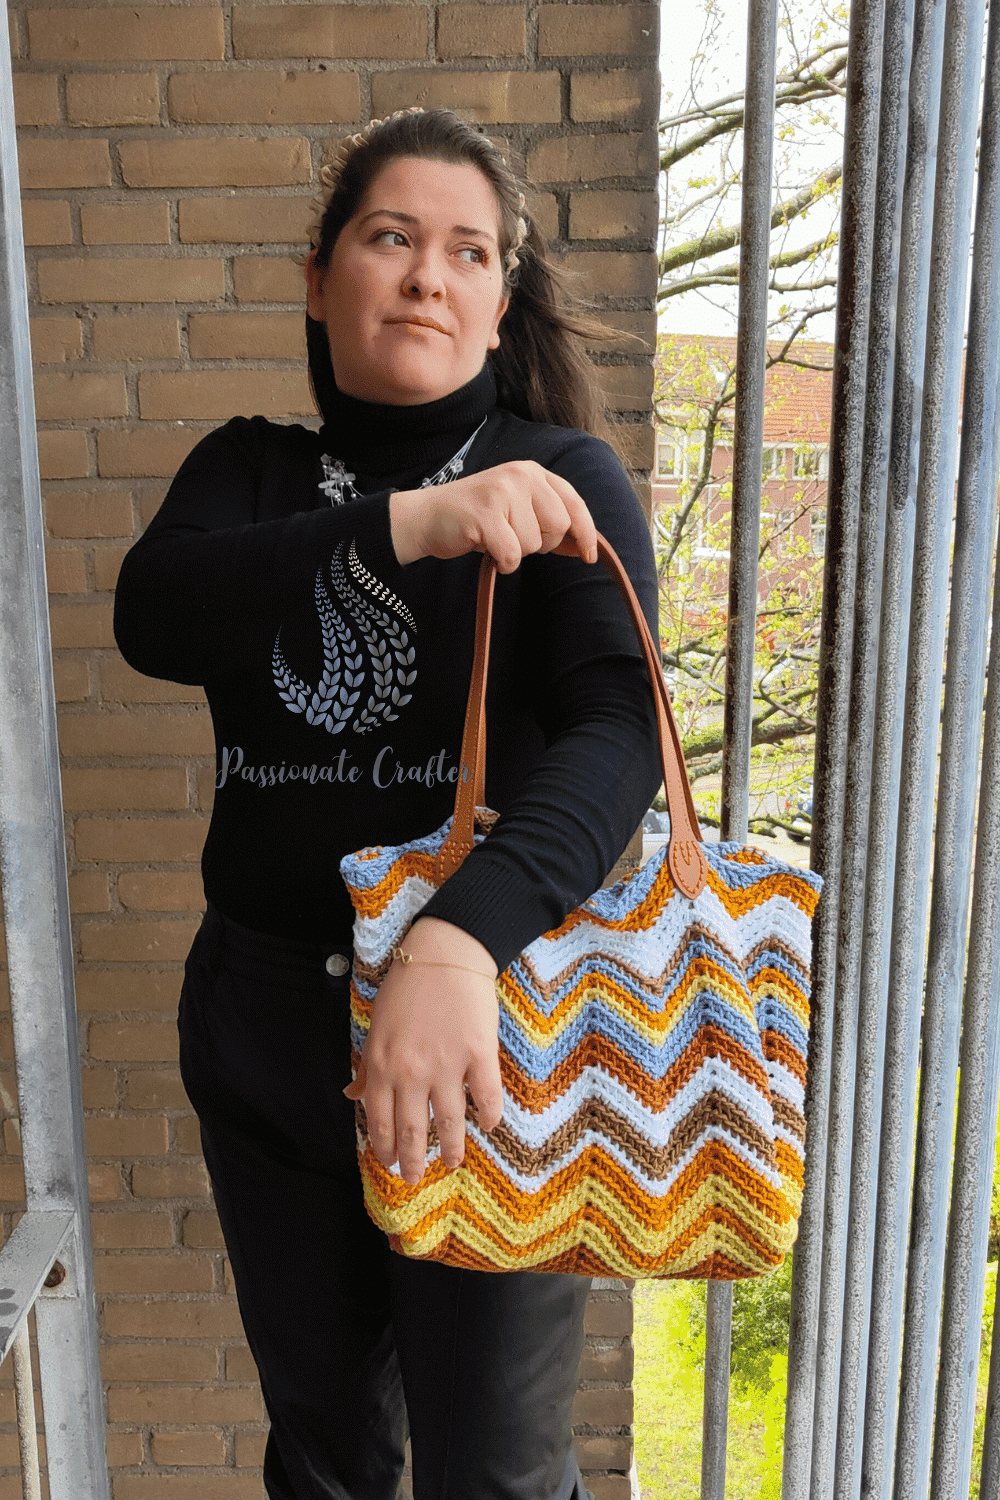
The bag is designed with the leftover yarns I had in my stash. So, the Chevron shoulder bag is an excellent project for utilizing those colorful skeins of yarn you’ve accumulated over time.
With Lion Brand’s 24/7 Cotton yarn, a favorite among crocheters for its durability and vibrant hues, you can dive into an ocean of color possibilities and create many delightful combinations.
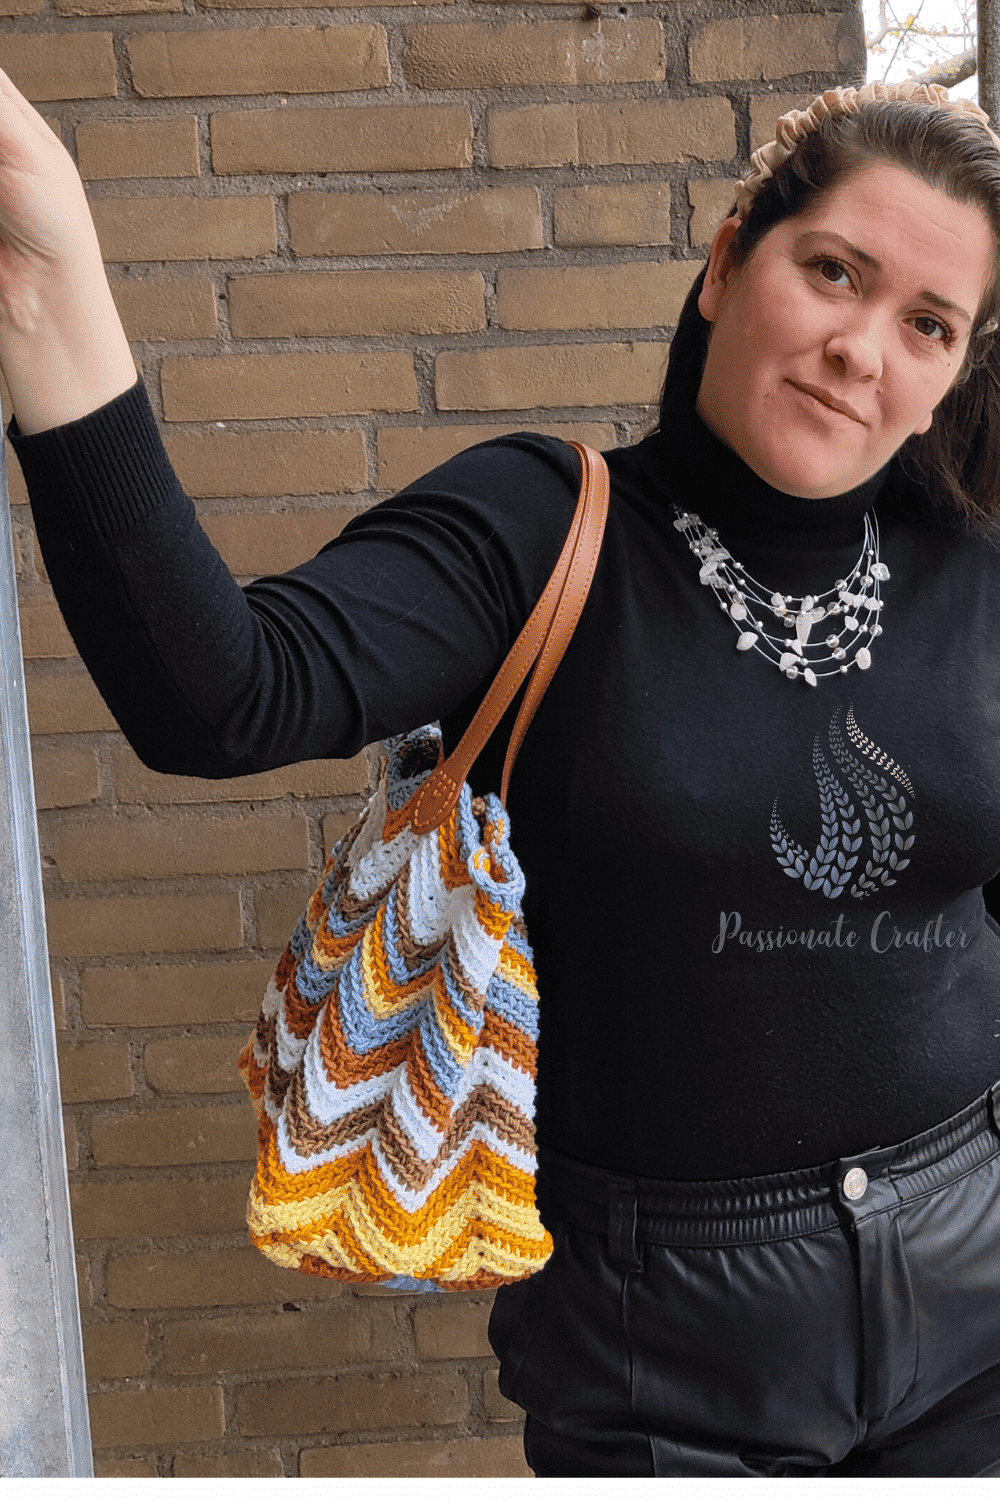
Below is all the information you need to crochet the chevron shoulder bag pattern, including the yarn, hook, materials, free written pattern, step-by-step photos, and a video tutorial.

How to crochet a chevron stitch?
For the Summertime shoulder bag, I used a simple zigzag design called the chevron pattern. It uses a simple single crochet stitch worked in the back loops only. To make this pattern, you add more stitches at the start and subtract some at the end, creating the chevron stitch’s picks and valleys.
It’s a cool project for intermediate crocheters who want to improve while making something pretty.
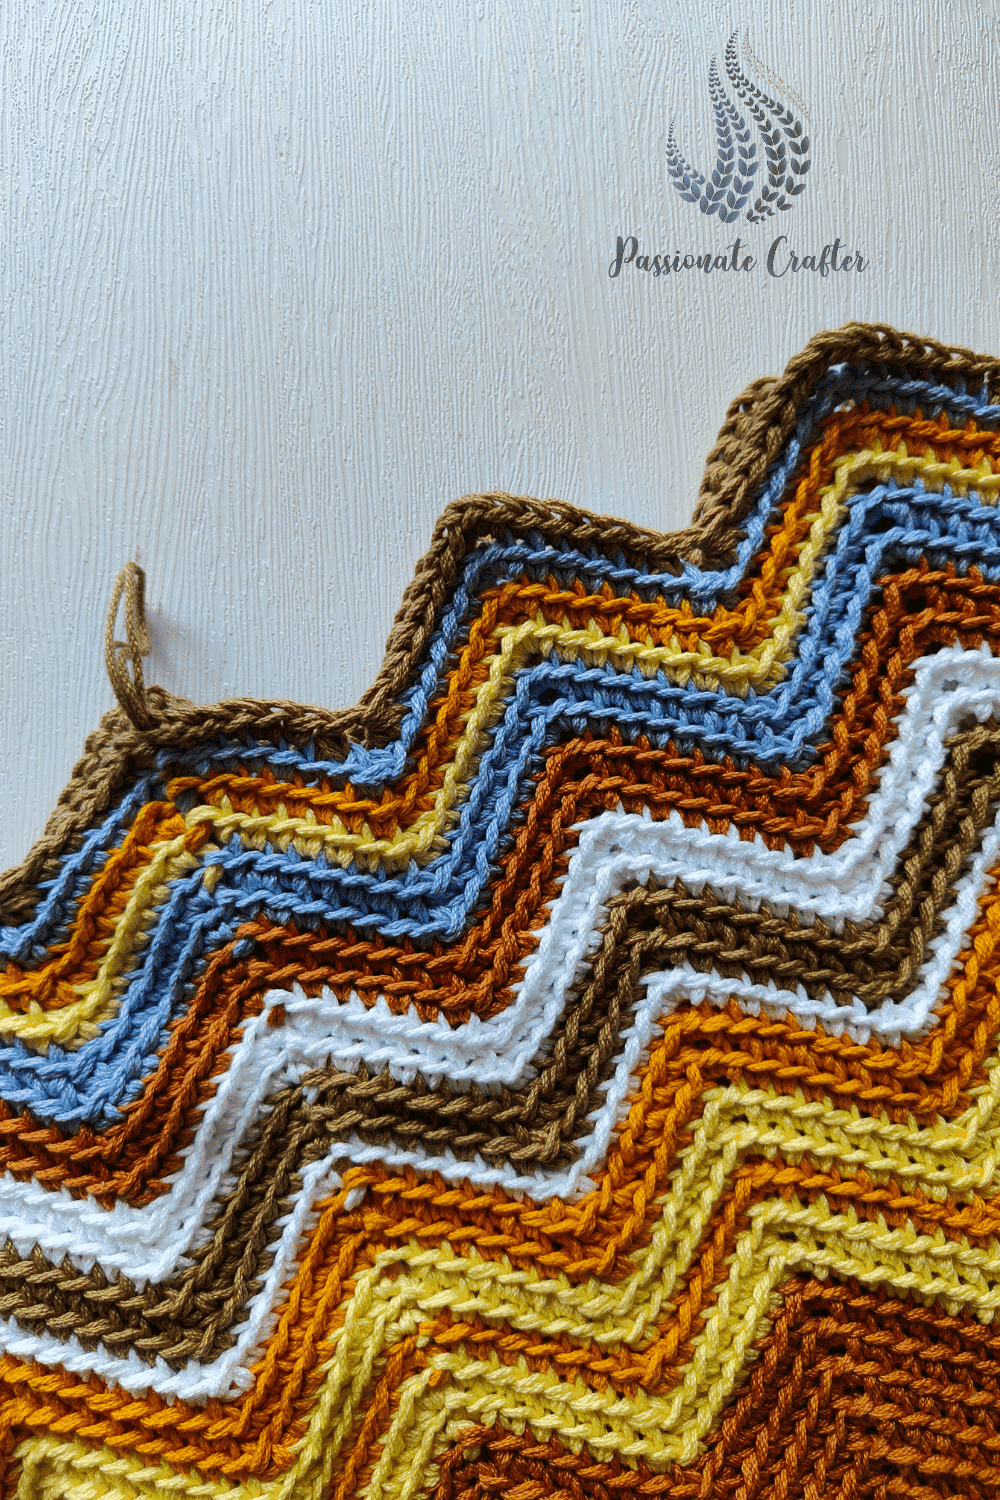
Carry yarn up or weave ends in?
If you choose to line your bag, you can simply carry the yarn through as you work, rather than cutting it after each round or color change. The lining will cover the yarn tails inside the bag, reducing the number of ends you need to weave in.
However, if sewing isn’t your forte and you prefer to use a bag organizer like I do, then you’ll need to secure your ends as you go along..
Recommended yarn for a Chevron bag
I designed this bag using leftovers from my stash, which includes a huge stash of cotton yarn from different brands. Lastly, I started using Lion Brand 24/7 cotton and liked how it works and how it holds its shape. That’s why I used 6-7 colors for the chevron bag.
As 24/7 cotton yarn is worsted-weight yarn and comes in many color options, it allowed me to use a good amount of leftovers. As you know, the mercerized cotton has a nice shine and is super durable, making it the perfect choice for a bag that will be worn a lot.

Yarn substitution
When substituting yarn, it is essential to find a similar yarn to the yarn used for the original pattern. This way, you can be sure that the gauge and the outcome will be the same. The 24/7 cotton yarn is mercerized cotton, giving the bag a nice shine and stretchiness.
So, if you choose a normal cotton yarn, the difference will be that it will not be as shiny as the mercerized one and will have less drape.
But again, if this is not essential for you, the most important part is to use leftover yarns from the stash.
Color combinations possibilities
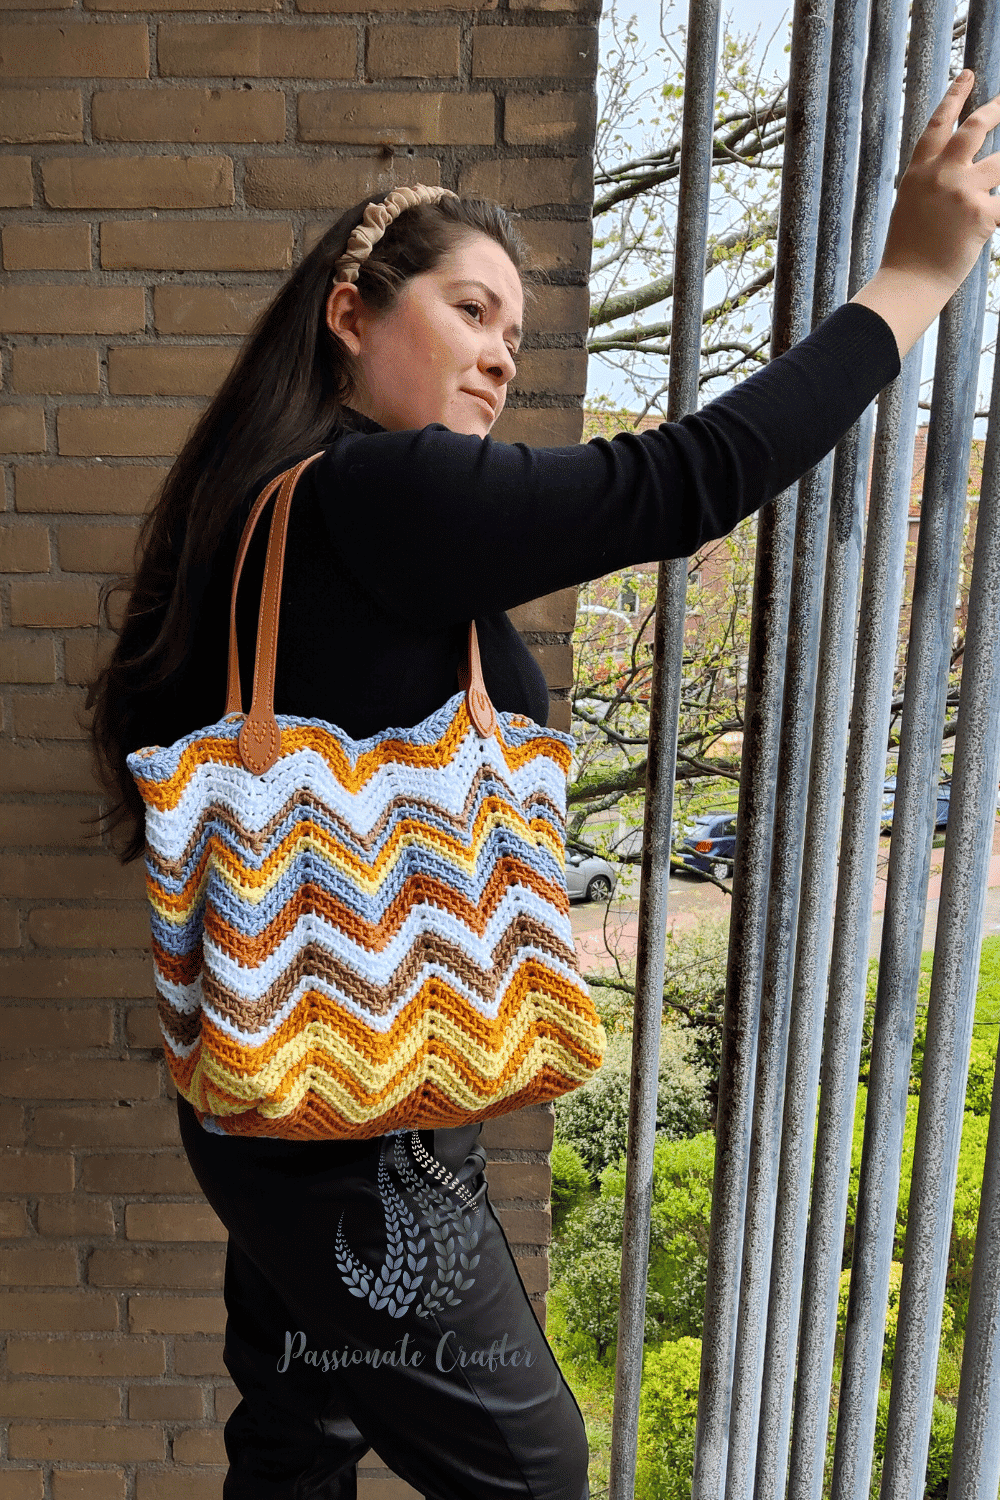
As most of the 100% cotton yarns come in huge color ranges, the color combinations for the chevron bag are endless.
For the first bag, I used more earthy tones like yellow, mustard, camel, sky blue, white, and khaki colors. For the second bag I crocheted for the video tutorial, I opted for more beachy colors like yellow, mustard, sky blue, navy, white, and ecru.
If you want to make the bag in more sophisticated colors, use white, black, grey, and ecru.

Save the pattern to your Pinterest board and crochet it later!
Don’t forget to pin this for later!

Materials
Scissors
Yarn needle
Faux leather handles 60 cm ( optional )
Bag organizer L-30x16x16 ( optional )
Metal magnetic closure 1.8 cm ( optional )
3-4 stitch markers
Measuring tape
Tape ( optional )
Crochet hook US E/4 ( 3.5 mm )
YARN:
Lion Brand yarn 24/7 Cotton 100% Mercerized cotton, 100gr/3.5 oz, 170m/186yd in colors:
Bag option 1: Camel 1 ball, Lemon 1 ball, Goldenrod 1 ball, White 1 ball, Bay Hale 1 ball, Sky 1 ball.
Bag option 2: Bay Hale 1 ball, Goldenrod 1 ball, White 1 ball, Sky 1 ball, Navy 1 ball, Lemon 1 ball, Ecru 1 ball.
Find more information for the total amount used in the Yardage paragraph.
Gauge
For one chevron:
From side to side 1 chevron is 10 cm/4”
10 rows = 10 cm/ 4”
Abbreviation:
- ch(s)- chain(s)
- sl st- slip stitch
- st(s)- stitch(es)
- sc- single crochet
- hdc- half double crochet
- dc- double crochet
- beg- beginning
- rep- repeat
- **- repeat the stitches in the ** indicated times
- dc2tog- double crochet two together
- sc2tog- single crochet two together
- YO- yarn over
- FO- fasten off
- opt – optional
- SDC2TOG- special double crochet 2 together
- PM – place marker
Finished size:
- Width- 30 cm
- Height- 30 cm
- Strap – 60 cm
- Depth – 18 cm
Step-by-step video tutorial
For this bag, I created a detailed video tutorial that guides you through the pattern. You can find the detailed tutorial here.
Pattern notes
- The pattern is written in US crochet terms!
- First, we will crochet the bag’s body in joined rounds from the bottom up, creating a tube. Then, we will sew the bottom of the bag.
- As I filmed a video tutorial, I crocheted a second bag. Below, you will find the color scheme for both. The bag is designed to use up leftover yarns. You can use the cotton yarn you have in your stash.
- Some photos are taken with different yarn, so you can easily see all the stitches. Do not get confused by this. Follow the color scheme provided for each of the bags.
- I used faux leather handles for one of the bags, but I will also provide instructions for crochet ones.
- For this bag, I held the yarn double. I pulled the yarn from the center, took the other end of the ball, and worked this way. If you are uncomfortable working like this, you can break the ball into two separate ones and work them together.
- There is a full step-by-step video tutorial where I show each step, so I encourage you also to check it out.
- As I could not sew, I didn’t add a lining; instead, I added an organizer so the bag would have a nice shape.
Special stitches
Double crochet two together- YO, insert your hook into the stitch, YO, pull through ( 3 loops on the hook ), YO, pull through the first two loops ( 2 loops on the hook ), YO, insert your hook into the next st, YO, pull through, YO, pull through the first two loops, ( three loops on the hook ), YO, pull through all the loops on the hook.
Single crochet two together– YO, insert your hook into the stitch, YO, pull through YO, insert your hook into the next st, YO, pull through, ( 3 loops on the hook ) YO, pull through all the loops on the hook.
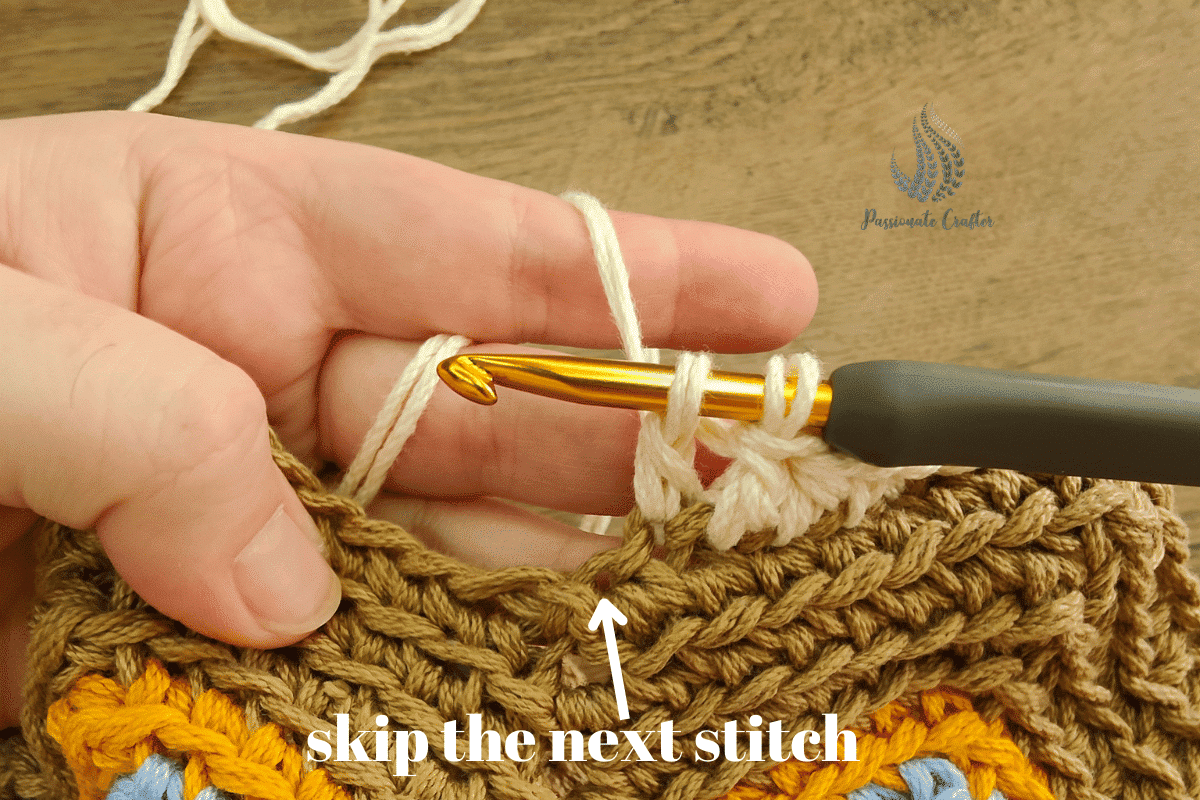
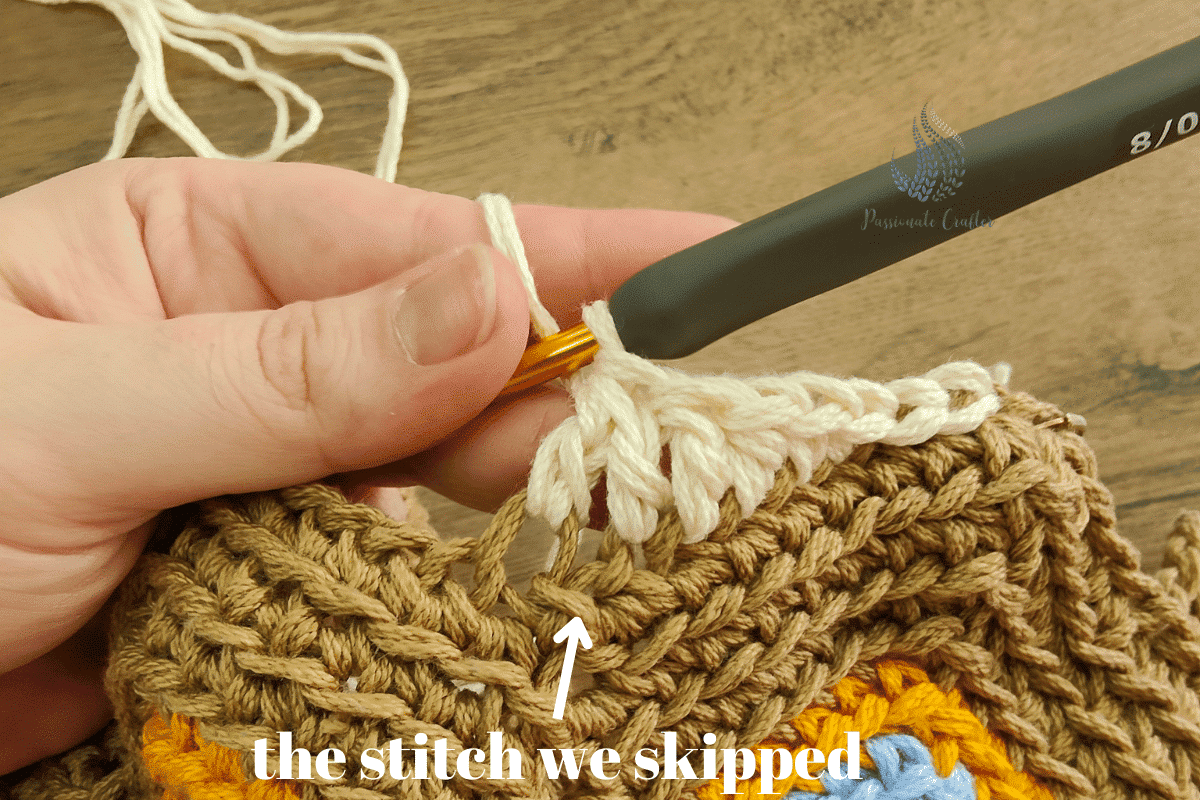
Special double crochet two together ( SDC2TOG )– YO, insert your hook into the stitch, YO, pull through ( 3 loops on the hook ), YO, pull through the first two loops ( 2 loops on the hook ), sk next st, YO, insert your hook into the next st, YO, pull through, YO, pull through the first two loops, ( three loops on the hook ), YO, pull through all the loops on the hook.
Yardage and yarn quantity
To be honest, I designed the bag using leftover yarn from my stash. And when I was crocheting, I forgot to measure how much yarn I used for each color. That’s why I decided to give you an estimated yardage used.
The total amount needed for a bag with crochet handles is around 485-500 grams and 440- 450 grams for a bag with faux leather handles. If you use your leftover yarns from your stash, the amount used per color is around 50 to 80 grams.

Prefer the PDF version?
Grab the ad-free, printable PDF pattern.
Download and print at home. View on your mobile device, tablet, or computer.
However, if you decide to purchase the yarn, I used six colors for bag option 1 and seven for option 2.
If you follow the color scheme for option 1, you will need one ball of each color (six balls in total); for option 2, you will need seven balls.
For bag option 1, I used a full 100gr ball of color Camel.
Color scheme
Option 1
Option 2

Rnd 1-6: Camel
Rnd 7-8: Lemon
Rnd 9: Goldenrod
Rnd 10-11: Lemon
Rnd 12-13: Goldenrod
Rnd 14: White
Rnd 15-16: Bay Hale
Rnd 17-18: White
Rnd 19-20: Camel
Rnd 21-22: Sky
Rnd 23: Lemon
Rnd 24: Goldenrod
Rnd 25: Sky
Rnd 26: Bay Hale
Rnd 27-29: White
Rnd 30-31: Goldenrod
Rnd 32: Sky
Rnd 1-3: Hay Bale
Rnd 4: Goldenrod
Rnd 5: Sky
Rnd 6-7: Navy
Rnd 8: Sky
Rnd 9-10: Navy
Rnd 11-12: Sky
Rnd 13: White
Rnd 14: Goldenrod
Rnd 15: Lemon
Rnd 16-17: Bay Hale
Rnd 18-19: White
Rnd 20: Ecru
Rnd 21: Sky
Rnd 22: Navy
Rnd 23-24: Lemon
Rnd 25-26: Goldenrod
Rnd 27: White
Rnd 28-29: Ecru
Rnd 30: Sky
Rnd 31-32: Lemon
Color Sky for the bottom of the bag and for joining it. Camel color for making the side seams of the bag’s bottom. Color Hay Bale for making the straps.
Color Ecru for the bottom of the bag and for joining it. Color Navy for making the side seams of the bag’s bottom.
Summertime shoulder bag pattern
Set up: Ch160 and slip stitch to the first st. Be careful not to twist the chain when joining.
Rnd 1: ch1, 2sc in same st, sc in next 7 sts, skip 1 st, PM to the skipped st, sc in next 7 sts, * 3 sc in next st, sc in next 7 sts, sk 1 st, sc in next 7 sts * rep till the end, join with sl st on top of first st.
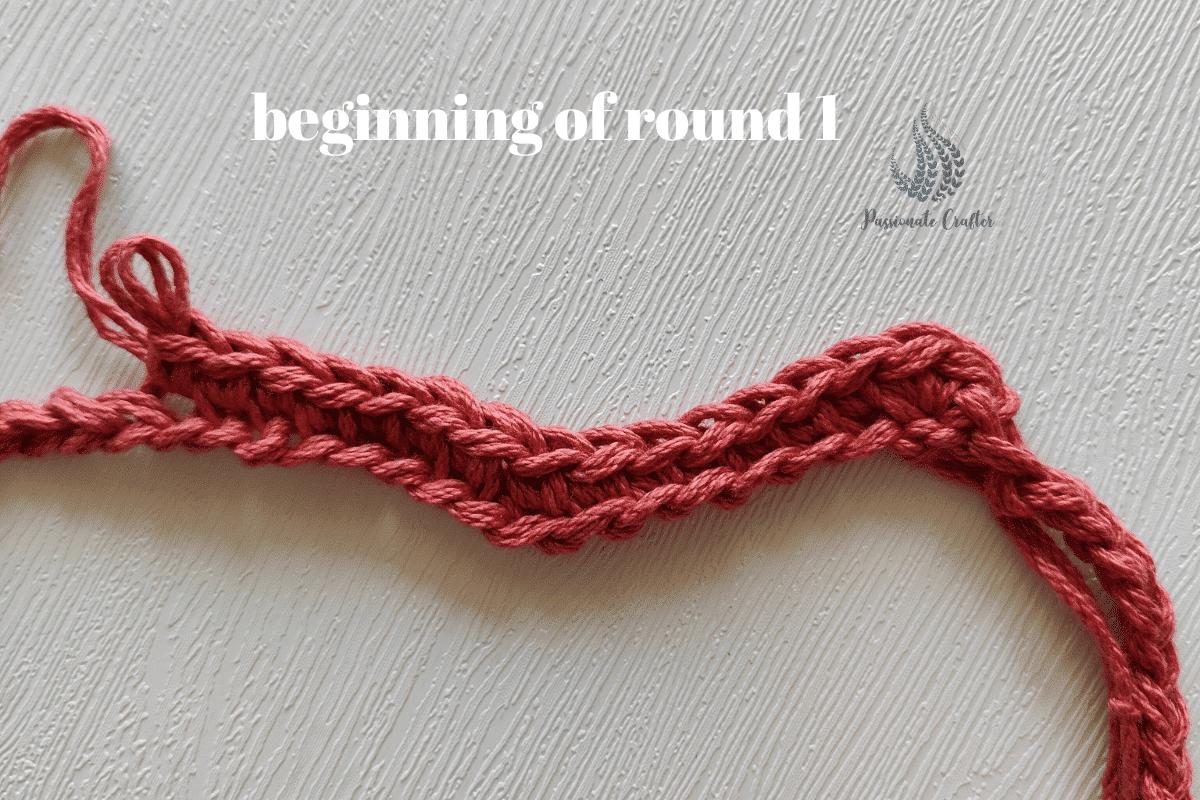
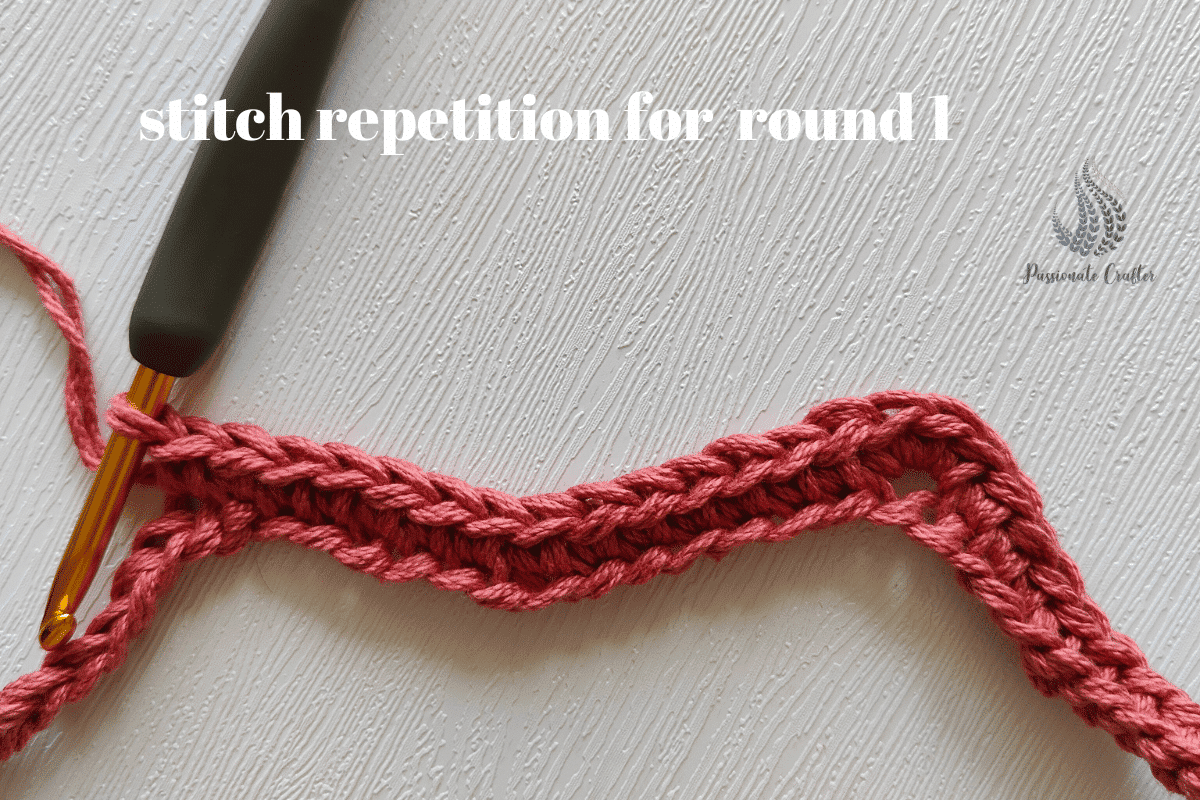
Work in the back loops only
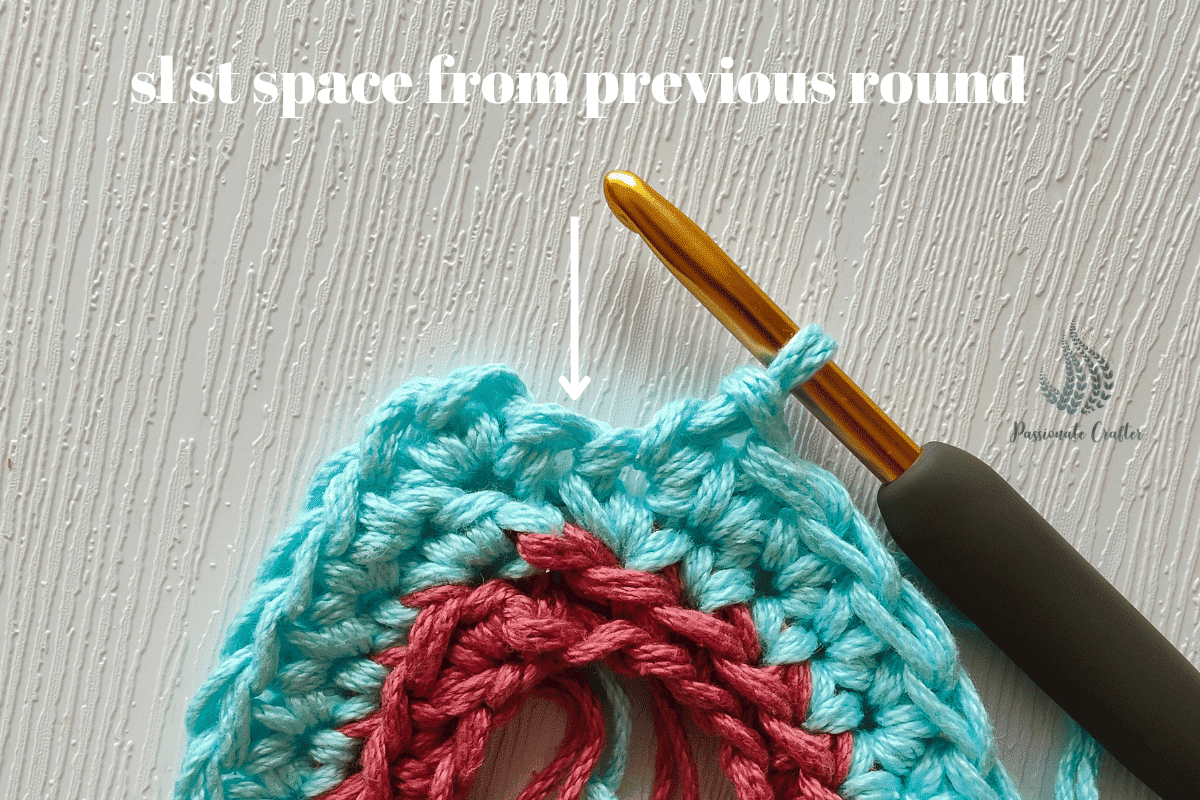
Rnd 2-25: Ch 1, 2 sc in same st, sc in next 7 sts, sk 2 sts, sc in next 7 sts, * 3 sc in next st, sc in next 7 sts, sk 2 sts, sc in next 7 sts * rep until the end. Place the last st into the sl st space from the previous round.
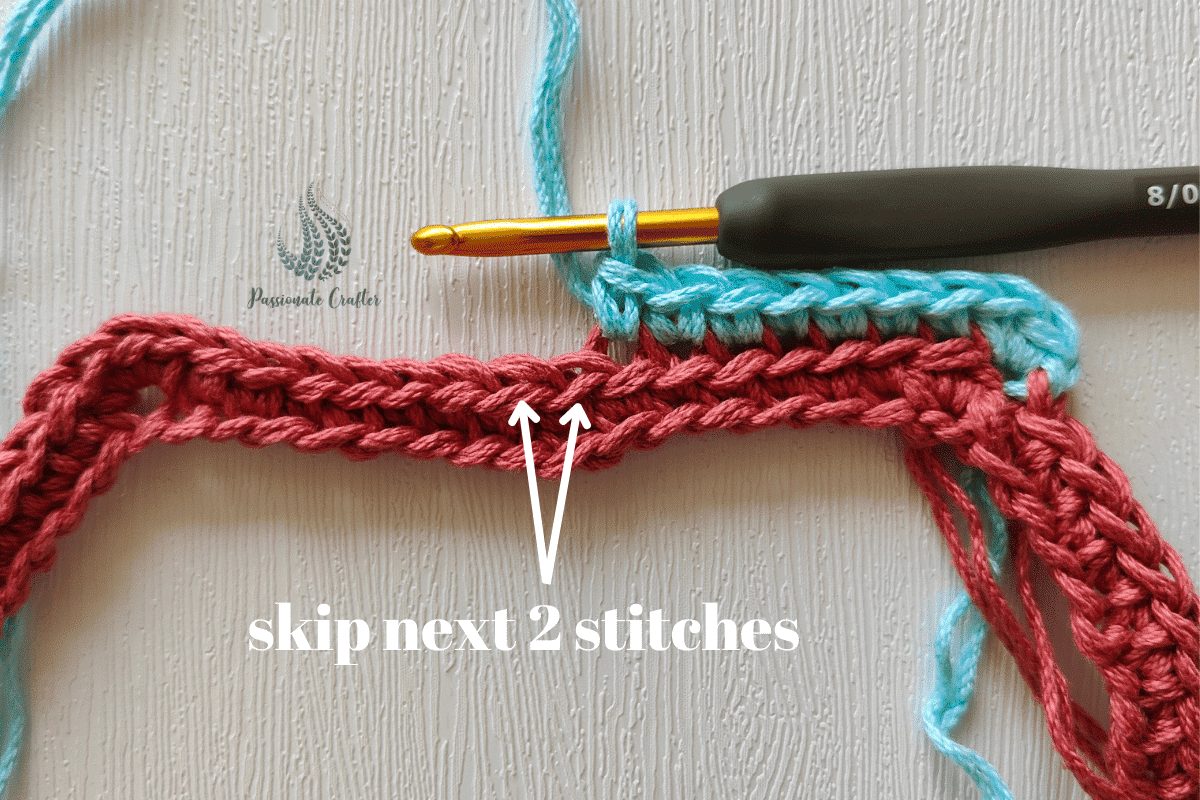
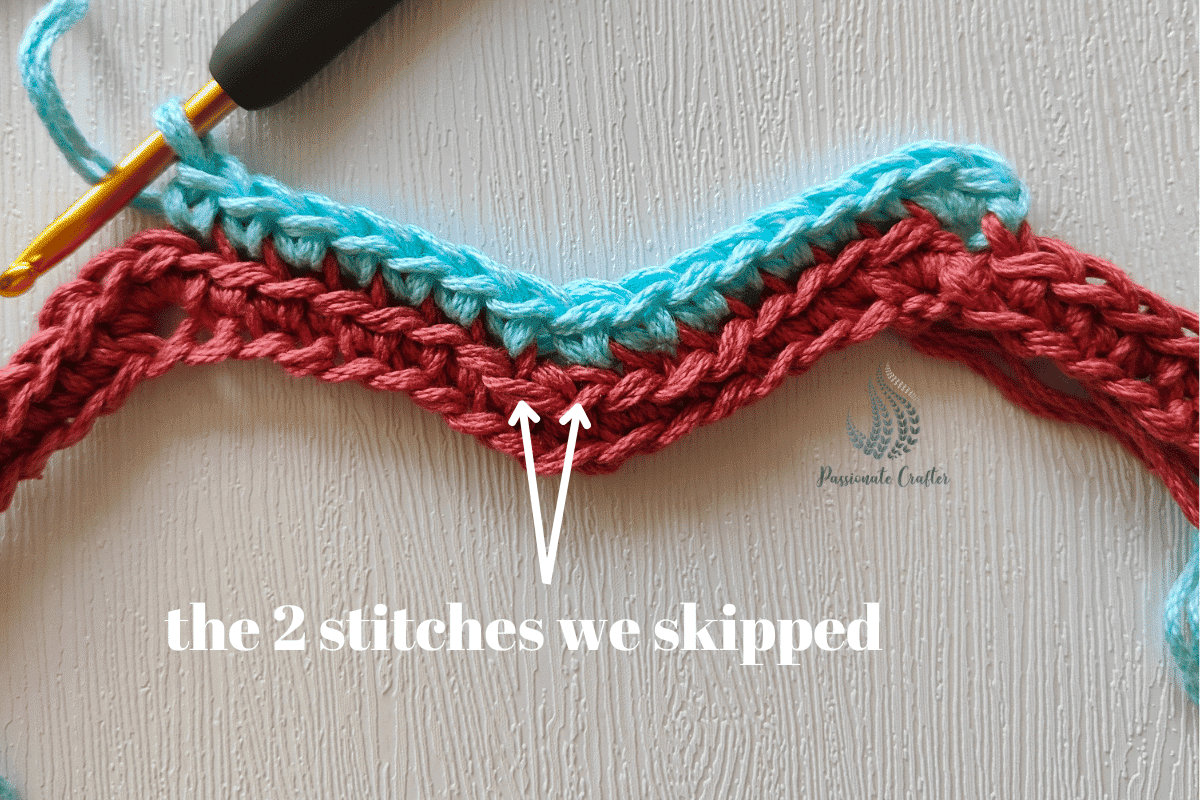
Usually the sl st space does not count as a stitch, but for this bag we will count it as a stitch space and we will work our last st into that space.
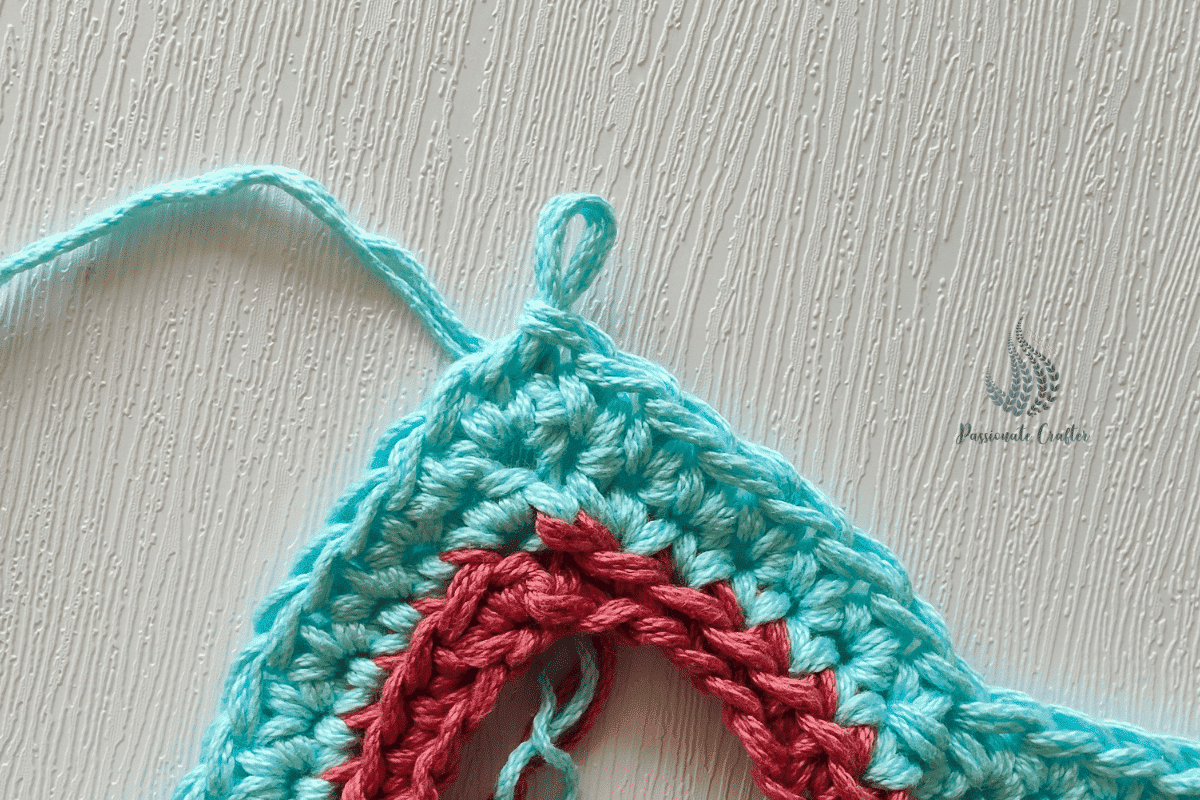
Important note
Don’t skip this step! If we do, the bag will twist and become misshapen.
How to close the bag’s bottom
After round 25, leave your piece as it is. We will now join and sew the bottom of the bag and, after that, continue with the bag’s body. To do so:
Turn your bag with the bottom part upwards. Insert your hook into the st we placed a stitch marker at round 1, take the yarn and pull up a loop, sl st in next 2 sts, sc in next 2 sts, hdc in next st, dc in next st, SDC2TOG, dc in next st, hdc in next st, sc in next 2 sts, * sl st in next 5 sts, sc in next 2 sts, hdc in next st, dc in next st, SDC2TOG, dc in next st, hdc in next st, sc in next 2 sts * rep till the last 3 sts, sl st in next 3 sts, join with sl st on top of first st.
Do not fasten off. Turn your work with the wrong side facing you.
Place the bag so that the working yarn is in the right corner.
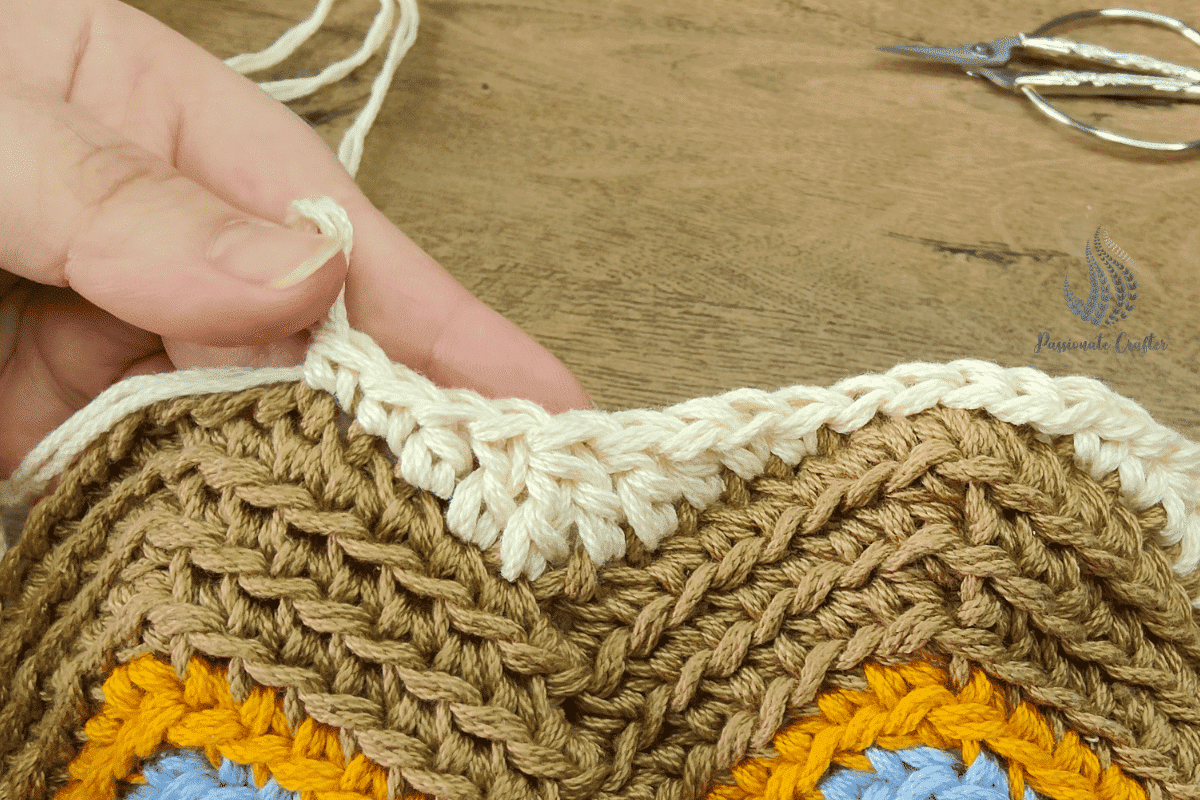
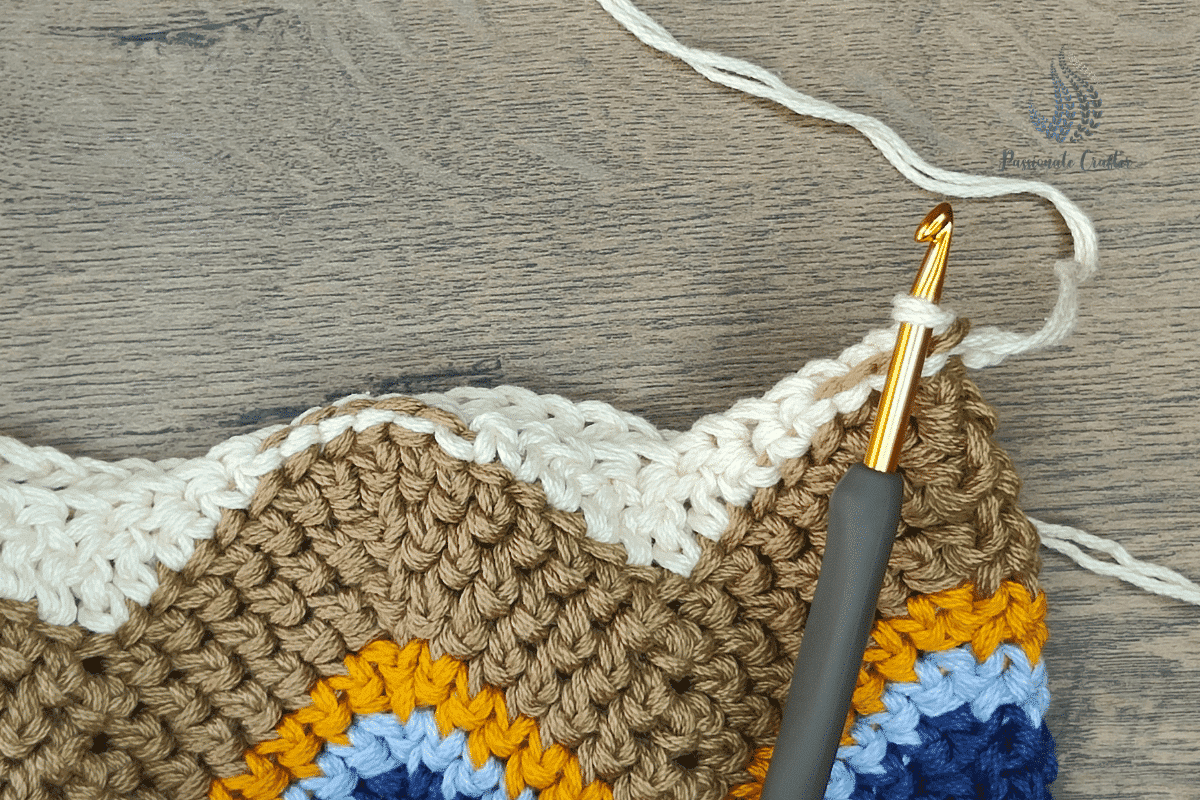
Now, we will start joining the bottom of the bag using the slip stitch method. To do so:
Take the working yarn and place the loop on your hook.
Then skip the first st, insert your hook into the second st from the first layer, and through the first st of the second layer and sl st.
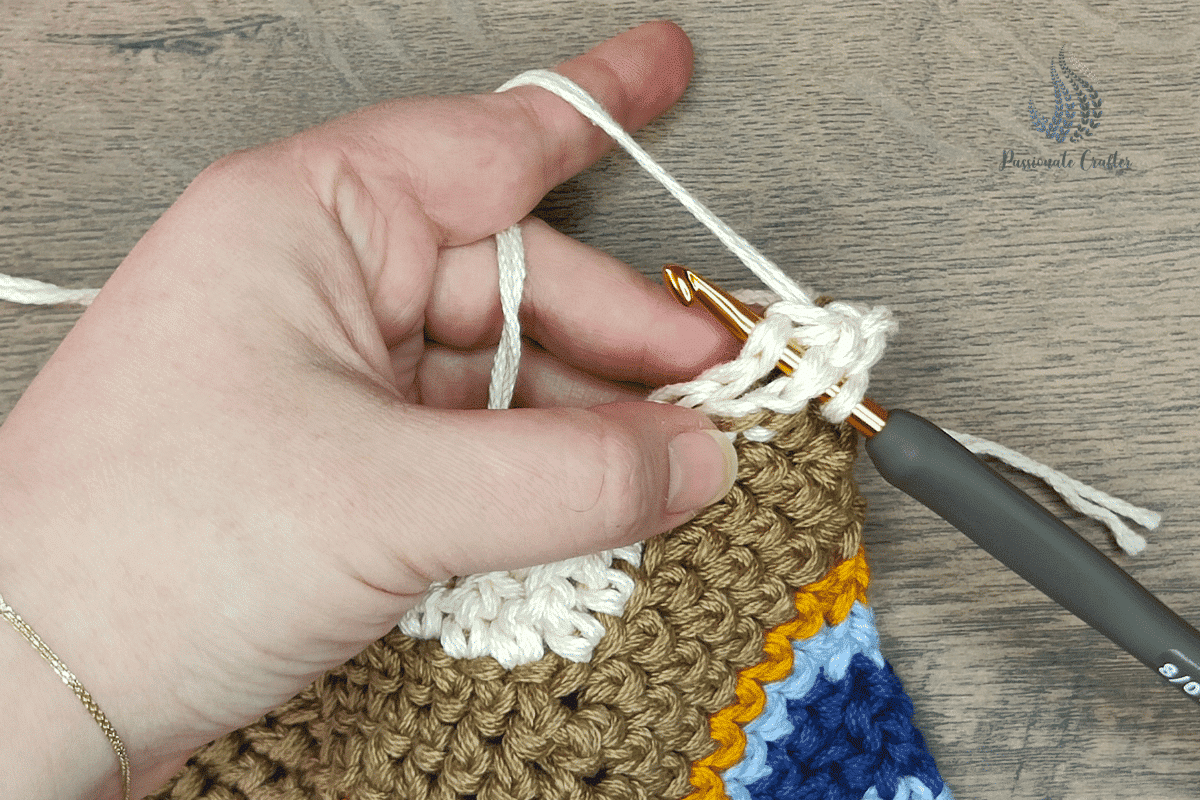
After that, insert your hook into the next st of the first layer and through the corresponding st of the second layer and make a sl st.
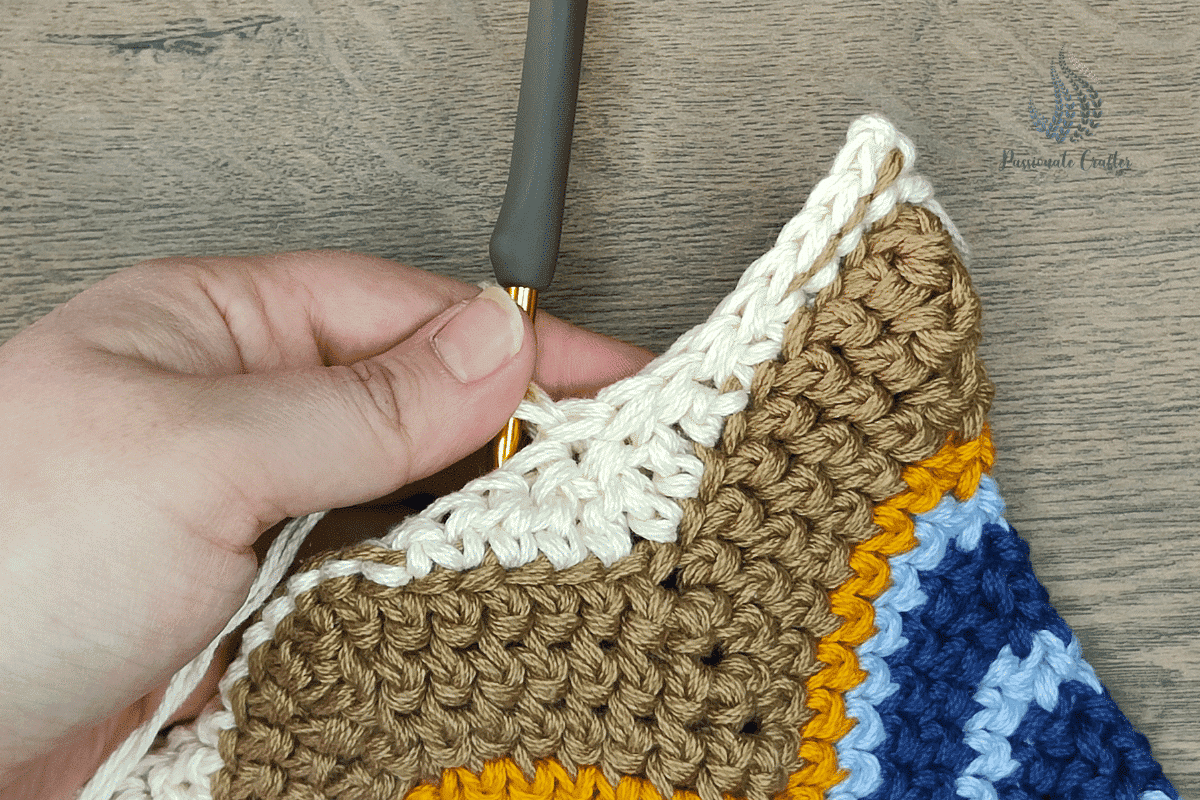
Continue working one sl st in each st by inserting the hook through both layers.
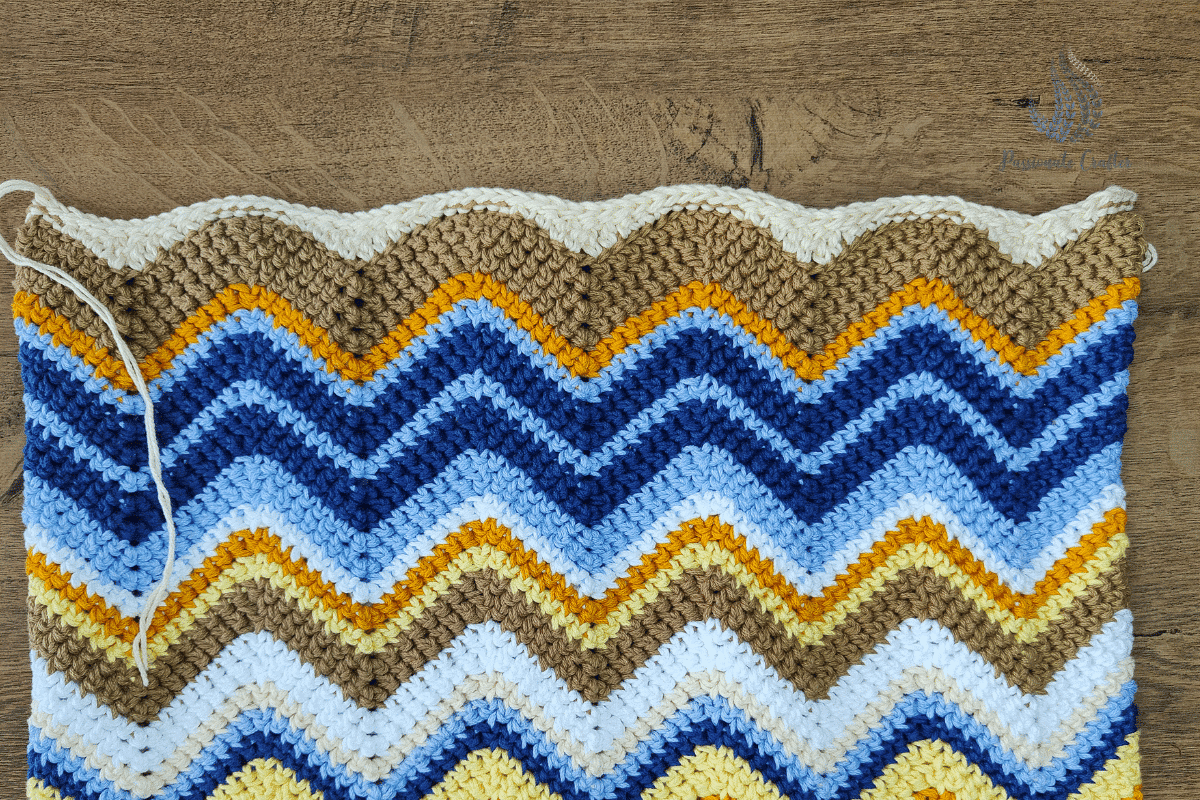
Important note: before creating the side seams
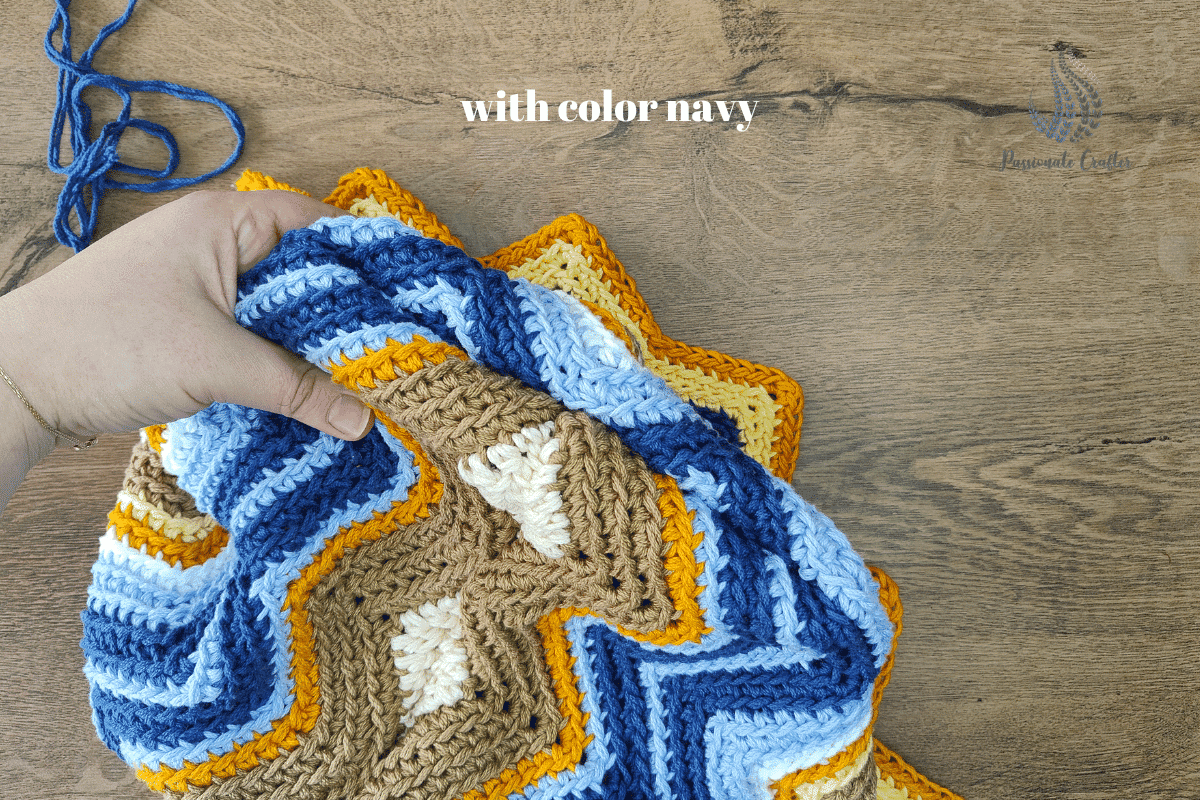
To sew the sides of the bag, use yarn similar to the color you will use for rounds 5-13 of the bag. As shown in the picture below, I used light and dark blue. So, for the sewing, I used a dark blue color. For example, to be more understandable, I used a cream color for the photo and video tutorial, and it is visible on the right side of the bag. See the pictures below.
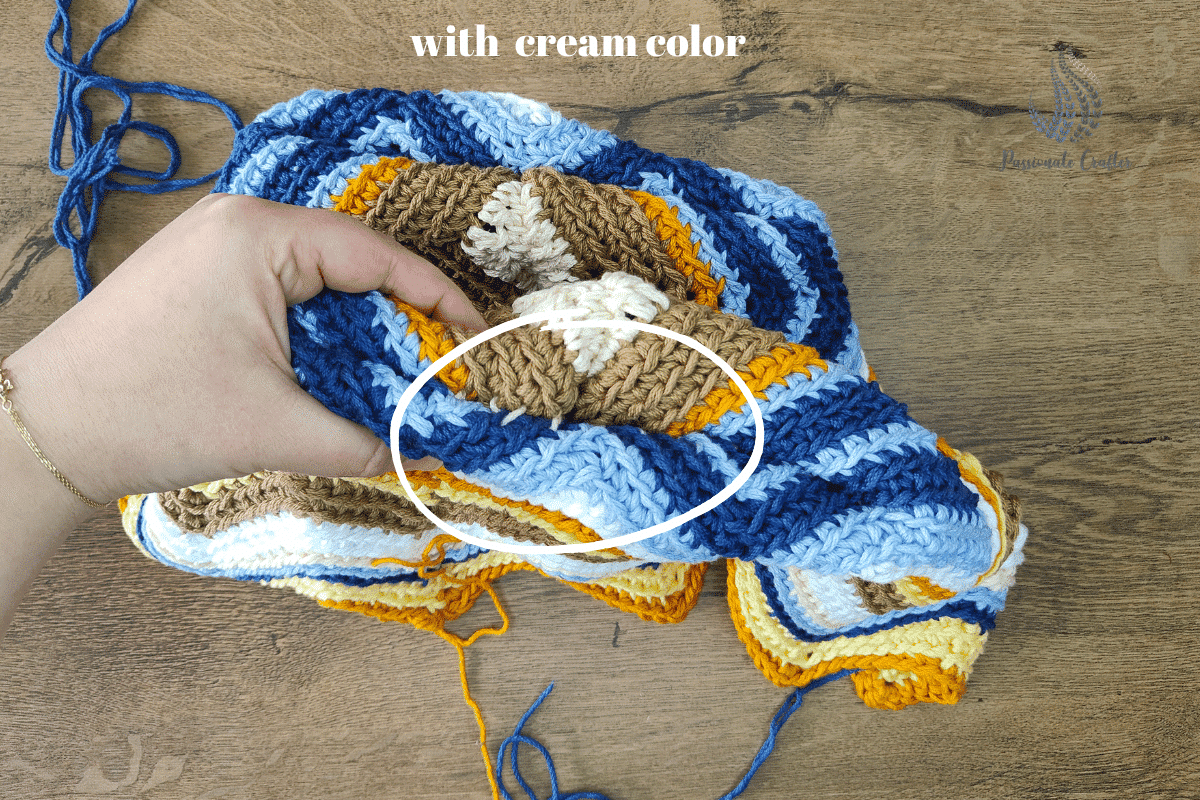
Still, with the wrong side facing you, position the bag so that one corner of the seam becomes the tip of the triangle. Basically, fold the back to a square with the seam centered vertically in the triangle. (shown in the photo below)
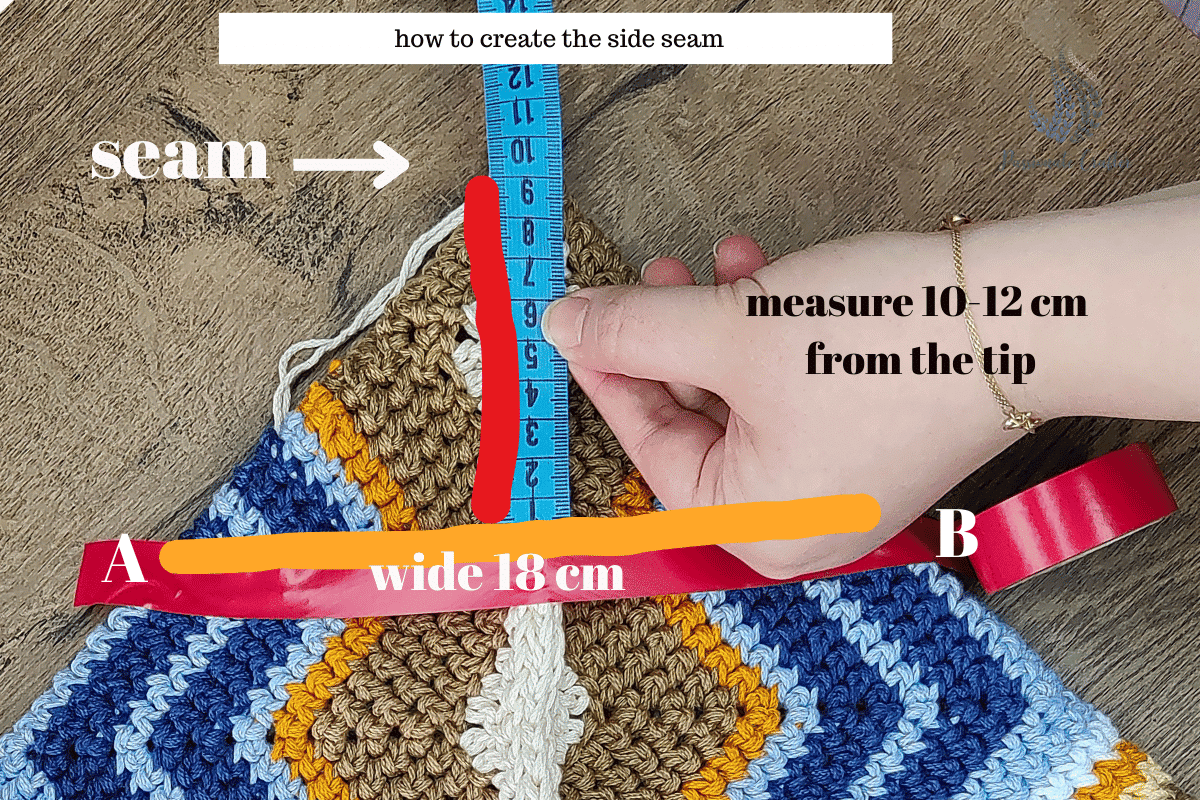
With the measuring tape, measure 10-12 cm down from the tip, as shown with the red line in the photo above. Then, mark it from point A to point B using colorful tape. You can also use stitch markers to mark both sides. The horizontal line ( the orange one in the photo above ) is 18 cm wide.
Then, sew a seam from point A to point B using a piece of yarn and a yarn needle. Be careful and work through both layers of the bag. Repeat the same steps for the other side.
Prefer the PDF version?
Grab the ad-free, printable PDF pattern.
Download and print at home. View on your mobile device, tablet, or computer.
The first photo shows how it will look after the seams are placed. The second photo shows how it will look inside the bag. And the third photo shows how it will look on the right side of the bag’s bottom.
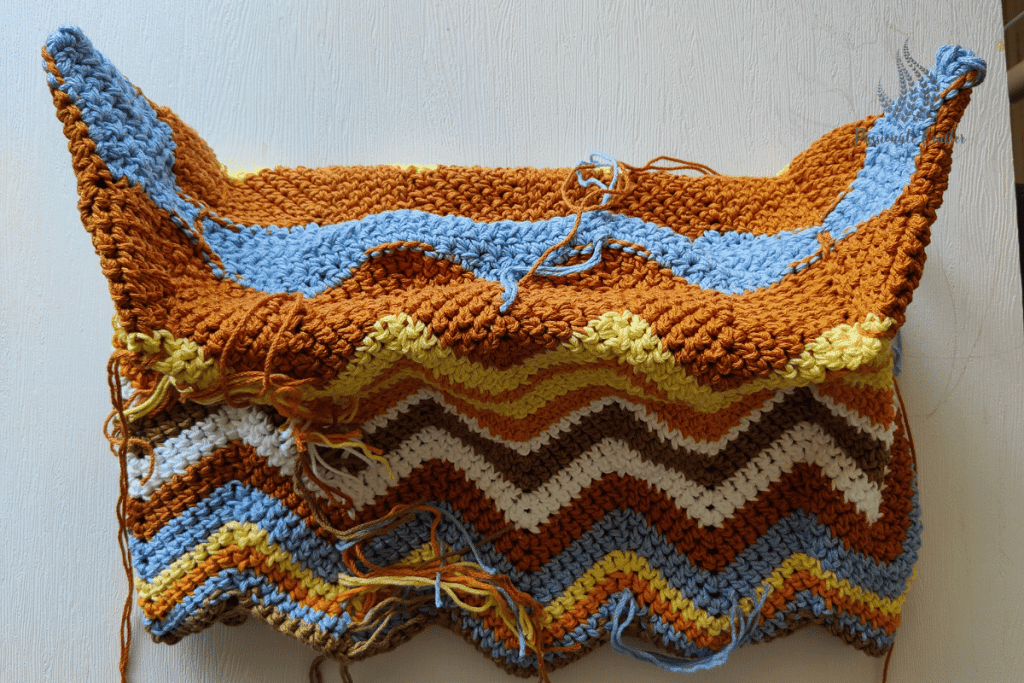
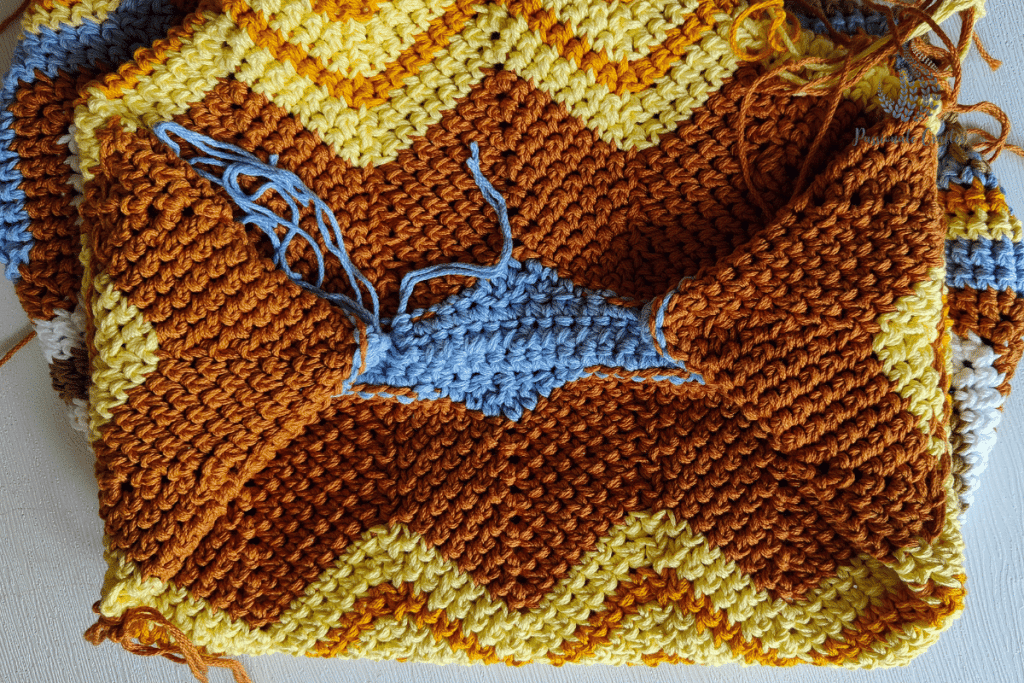
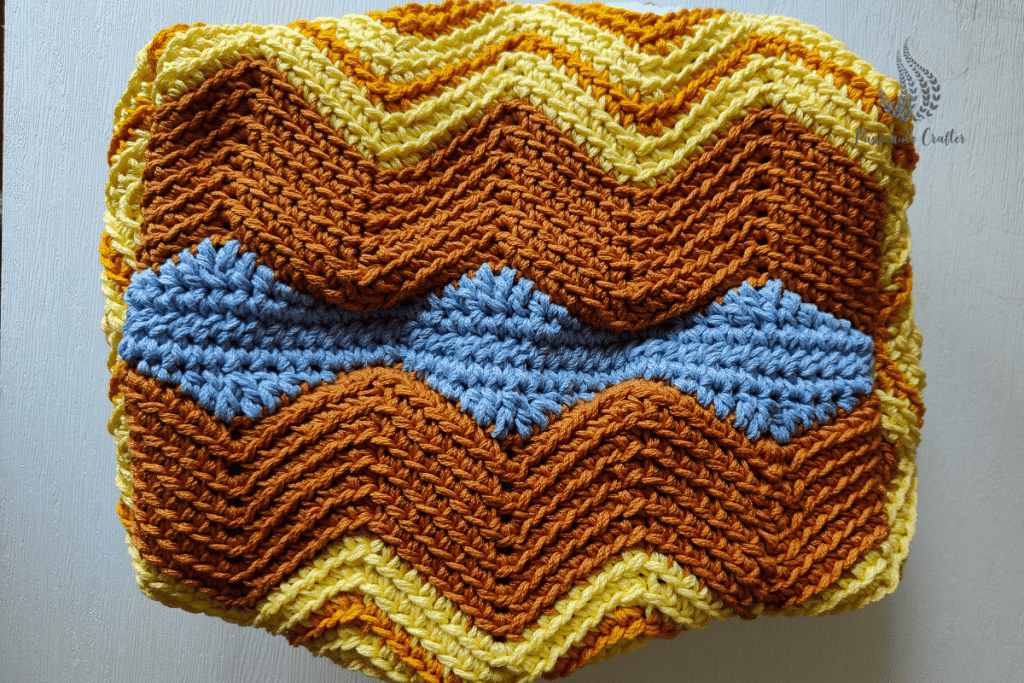
Now, we will continue with the bag’s body
Work in the back loops only
Rnd 26: ch1, 2 sc into the same st, sc in next 5 sts, sc2tog, sk 2 sts, sc2tog, sc in next 5 sts, * 3 sc in next st, sc in next 5 sts, sc2tog, sk 2 sts, sc2tog, sc in next 5 sts * rep till the end, join with sl st on top of first st.
Rnd 27-28: ch1, 2 sc into the same st, sc in next 6 sts, sk 2 sts, sc in next 6 sts, * 3 sc in next st, sc in next 6 sts, sk 2 sts, sc in next 6 sts * rep till the end, join with sl st on top of first st.
Rnd 29: ch1, 2 sc into the same st, sc in next 4 sts, sc2tog, sk 2 sts, sc2tog, sc in next 4 sts, * 3 sc in next st, sc in next 4 sts, sc2tog, sk 2 sts, sc2tog, sc in next 4 sts * rep till the end, join with sl st on top of first st.
Rnd 30-31: Ch 1, 2 sc into the same st, sc in next 5 sts, sk 2 sts, sc in next 5 sts, * 3 sc in the next st, sc in next 5 sts, sk 2 sts, sc in next 5 sts * rep until the end, join with sl st on top of first st.
For round 32 we will count the joining sl st as our first st. You can place a stitch marker to indicate this stitch.
Rnd 32: sl st in next st, sc in next st, hdc in next st, dc in next 2 sts, dc2tog, dc in next 2 sts, hdc in next st, sc in next st, * sl st in next 3 sts, sc in next st, hdc in next st, dc in next 2 sts, dc2tog, dc in next 2 sts, hdc in next st, sc in next st * rep till the end. Fasten off.
Crochet handles
We will crochet in the back loops only and in continuous rounds for the handles. So do not join at the end of the round. You can place a stitch marker to indicate your first st.
Also, when you start your magic ring, leave a longer tail so we can use it to sew the handle later.
Using a 3.5 mm crochet hook and Hay Bale color
Rnd 1: Start with a magic ring and make 8 sc into it.
Rnd 2: sc in each st around
Repeat round 2 till your handles reach 60 cm. Leave a longer tail for sewing.
Crochet two pieces.
Sewing the handles
If you are going to use the bag without lining!
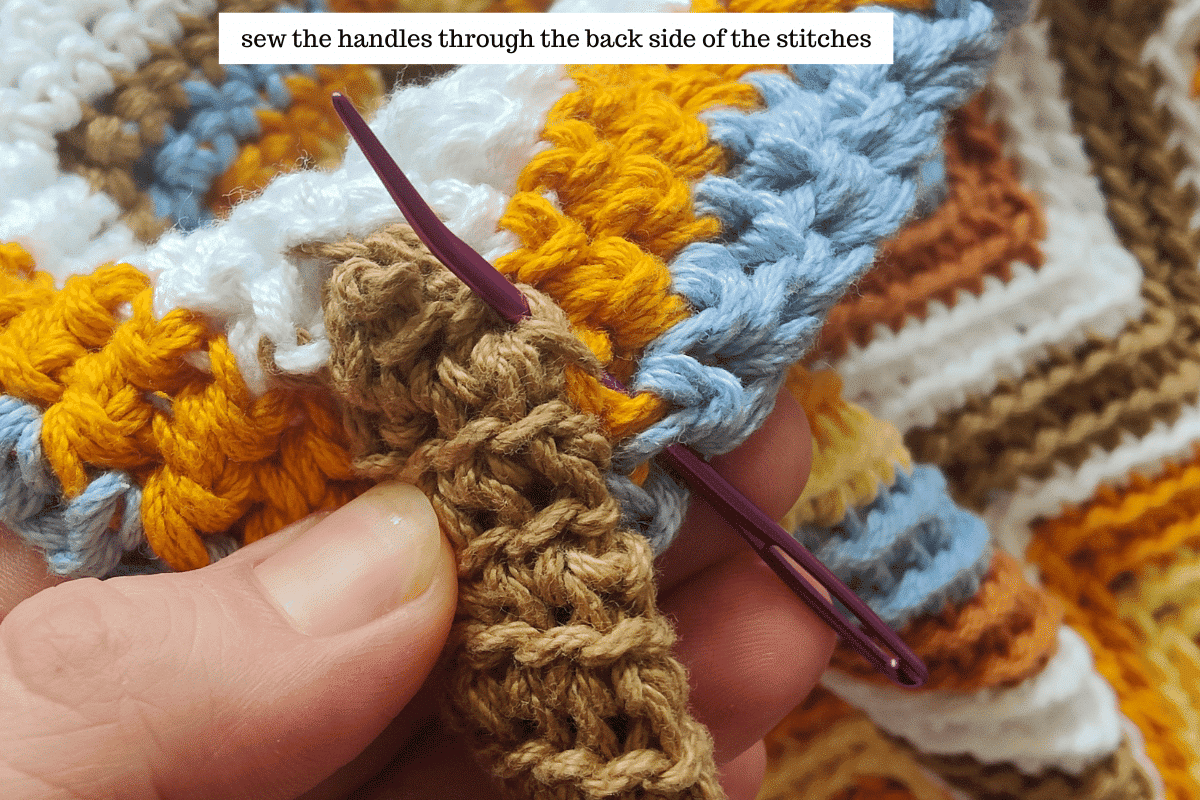
It does not matter what type of handles you use—leather or crochet—it depends only on where you attach them. I attached mine on the inside of the bag, but you can also sew them on the outside of the bag.
If you sew them inside your bag, try to sew them by inserting the yarn needle through the back side of the stitches, not the fabric itself. This way, the seam will be invisible.
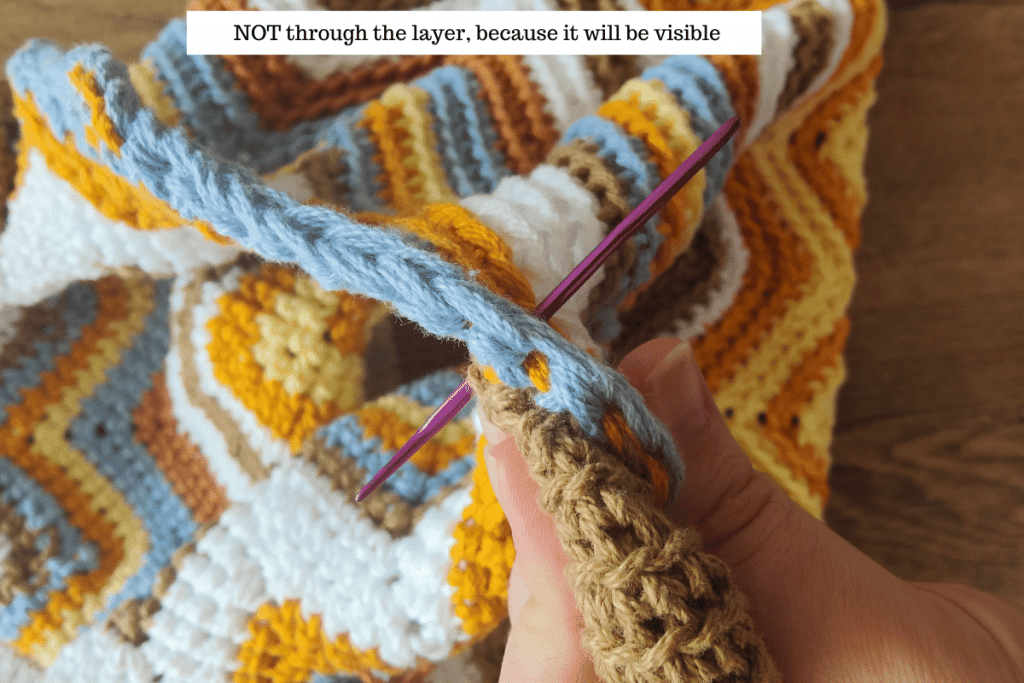
If you sew them on the outside of the bag, like the leather ones on bag option 2, try to insert the needle through the leather handle and through the front side of the stitches, not the fabric itself. See the picture below.
How to attach a magnetic metal closure
This step is optional! You can use a magnetic metal closure. There are different options for them. If you have ones that can be sewn, use the same sewing method as the handles.
Happy crocheting!
Prefer the PDF version?
Grab the ad-free, printable PDF pattern.
Download and print at home. View on your mobile device, tablet, or computer.
Invitation to our Facebook group
You are welcome to share your projects made with our patterns with the community and us. We are thrilled to see your creations, and you are very welcome to share them on our FACEBOOK PAGE HERE, our FACEBOOK GROUP, or on INSTAGRAM by using the hashtag #passionatecrafterr.
Follow us on Pinterest and Instagram for more content and crochet patterns.
What’s Next?
Pin this post: Save this tutorial to your Pinterest boards so you can return to it later.
Share Your Thoughts: I’d love to hear your feedback. Comment below and tell me your thoughts!
Share on Instagram or Facebook: We will be thrilled to see your creations, and you are very welcome to share them by using the hashtag #passionatecrafterr or tag us @passionatecrafterr
More free crochet patterns
If you liked this post, check out the Chevron blanket, which comes in 15 sizes.
More bag patterns