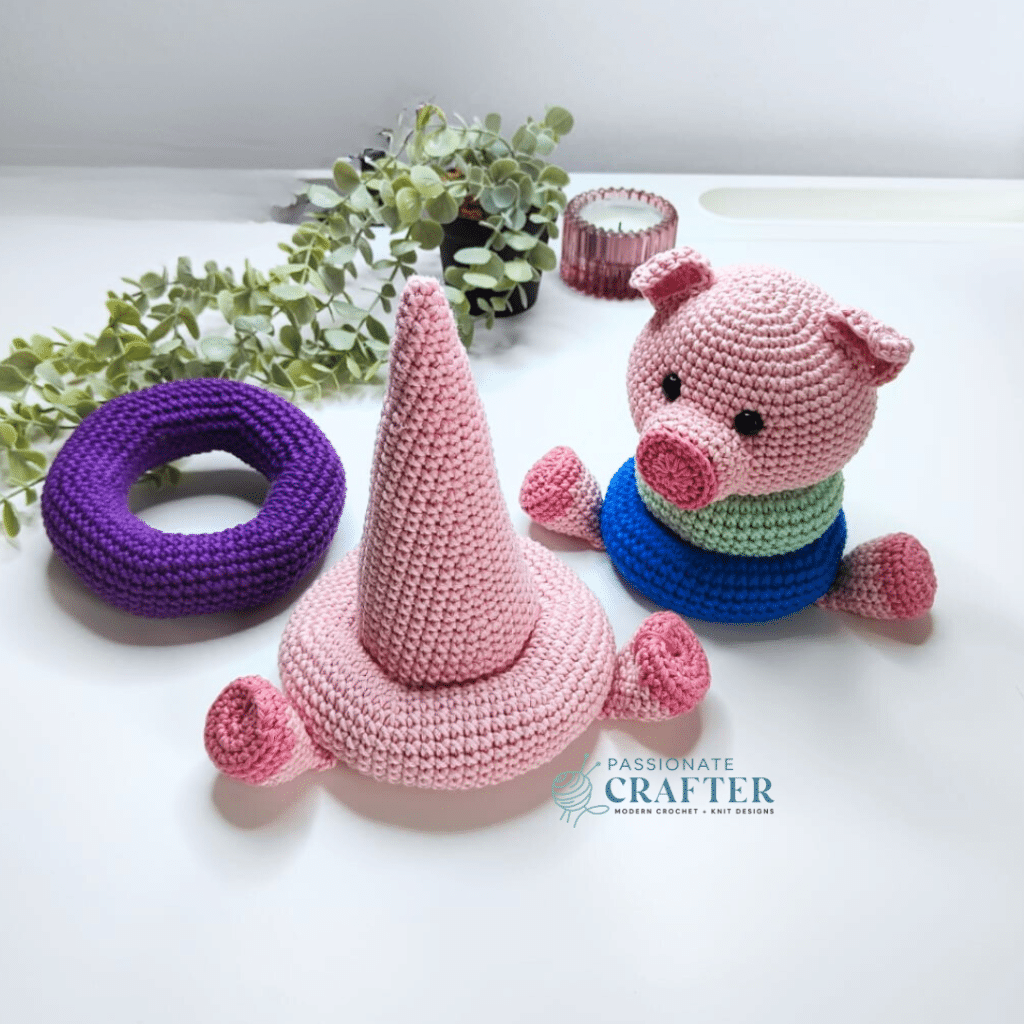
Oink, stack, and play! This adorable stacking pig toy is the perfect handmade project for playful decor or a charming gift for little ones. Designed with a fun stacking-ring structure, this piggy combines cuteness and creativity in one unique toy.
It’s made using only basic crochet stitches and simple shaping techniques, making it an easy and enjoyable pattern for most crocheters. Scroll done for the free pattern or buy the ad-free, printable PDF here.

Why Make a Stacking Pig Toy?
Stacking toys are a great addition to any toy collection, especially for babies and toddlers. They help young children develop important skills like:
- Hand-eye coordination
- Fine motor skills
- Problem-solving
- Understanding size and order
This piggy stacking toy adds a playful twist to the classic stacking ring set. Instead of plain rings, each layer is part of a cute pig character, making it both functional and fun.
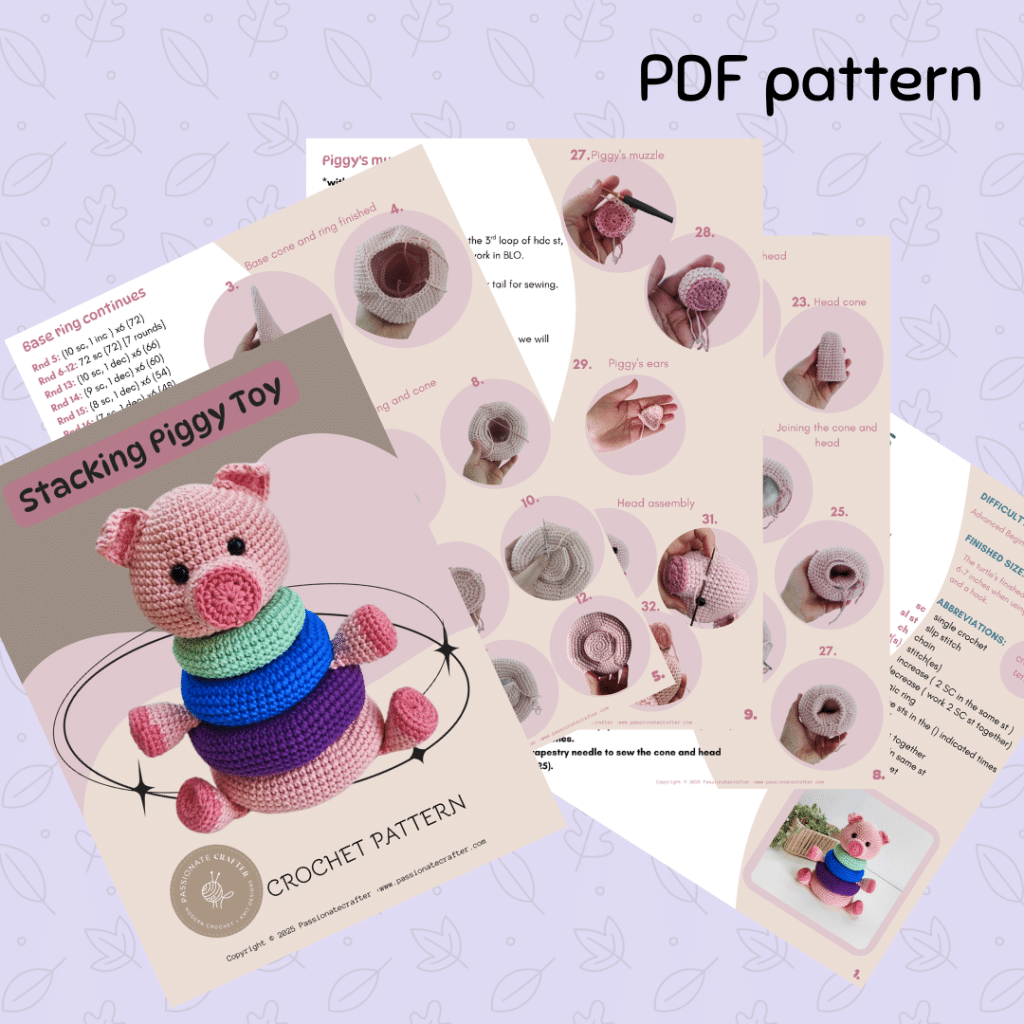
Get The PDF Version
Grab the ad-free, printable PDF pattern.
Download and print at home. View on your mobile device, tablet, or computer.
What You’ll Need
To make this toy, you’ll need:
- Worsted weight yarn in pink and dark pink (or any colors you like)
- A suitable hook size (usually around 3.5–4.0 mm)
- Polyester stuffing
- A tapestry needle
- Safety eyes (or you can embroider the eyes for a baby-safe version)
Pattern Overview
Here’s what you need to know before you get started:
- Skill Level: Easy
- Techniques Used: Working in the back loops only (blo), single crochet (sc), half double crochet (hdc), working in continuous rounds.
- Construction: Starts with the base ring and cone. Afterwards, we will make the rings and piggy’s head.
Tips for Success
- Take your time when assembling the pieces—positioning the legs, ears, and muzzle carefully will help your piggy look just right.
- Stuff the parts evenly as you go. It’s harder to add stuffing later.
- If you’re making this for a baby, consider using embroidered features instead of safety eyes for added safety.
Get the Printable PDF
Prefer to crochet without ads? You can also purchase the printable, ad-free PDF version of the stacking pig toy from out Etsy and Ravelry shops.
Get The PDF Version
Grab the ad-free, printable PDF pattern.
Download and print at home. View on your mobile device, tablet, or computer.
Copywrite
The Stacking Pig Toy pattern and its contents are the property of Passionatecrafter LTD and are protected by copyright laws. This pattern may not be copied, shared, distributed, or reproduced in any form without prior written permission, except for sharing links on social media. Unauthorized use of this pattern may result in legal action. This free crochet pattern is intended for personal use and viewing on the blog only. By accessing it, you agree to these terms. For any questions regarding use, please contact Passionatecrafter LTD.
Thank you for respecting my work and creativity!
How to Unlock Exclusive Content on Our Blog
Accessing exclusive content is easy! Simply click the box below, and the Grow.me app will appear, prompting you to enter your email and create a password. Once your account is set up, you can log in anytime to view exclusive content on my blog. Just be sure to switch to the login screen when entering your credentials.
If you ever forget your password, click the “Forgot Password” link and follow the steps to reset it. Please note that I don’t have access to Grow accounts and cannot assist with password recovery, so be sure to store your login details securely.
Thank you for subscribing and being part of my crochet journey! I hope you enjoy the exclusive content and find inspiration for your next beautiful crochet project.
Stacking Pig Toy Crochet Pattern

Materials:
- HOOK SIZE: Crochet hook size 3.5mm
- YARN WEIGHT AND COLORS:
Super bulky weight yarn– worsted weight cotton yarn- Hobbii rainbow cotton 8/8, 100% cotton, 50 g, 75 m in colours:
– 170 g light pink (main colour)
– 20 g dark pink
– 17 g mint (small ring)
– 25 g royal blue (middle ring)
– 37 g purple (large ring)
- Poly fiberfil for stuffing
- Tapestry needle
- stitch marker
- Safety eyes- 12,14 or 16mm (a pair)
- a pair of scissors
Finished size: The Stacking piggy size is 24-25 cm/9.5 inches with ears.
Abbreviation
sc single crochet
sl st slip stitch
ch chain
st(s) stitch(es)
inc increase ( 2 SC in the same st )
dec decrease ( work 2 SC st together)
MR magic ring
() repeat the sts in the () indicated times
FO fasten off
sc3tog work 3 sc sts together
hdcinc make 2 hdc sts in same st
hdc half double crochet
BLO back loop only
Pattern notes
- The pattern is worked in continuous/ spiral rounds. Do not join your rounds with a sl st unless stated otherwise
- Use a stitch marker or a piece of yarn to mark the first stitch. Move the marker after completing the round.
- For my amigurumi, I use the ‘’Yarn Under’’ method.
Special stitch
Working in 3rd loop of HDC st– This loop is located just behind and nearly parallel to the normal loops typically worked on.
Once done, you have the front loop and back loop on top.
Turn your stitch a bit, and you will see the third loop right below the back loop.
Once you work in the 3rd loops of hdc you will get raised stitches in the right side of your work.
Stacking Pig Toy Base Cone
*with MC
Rnd 1: MR of 6 sc (6)
Rnd 2: 6 sc (6)
Rnd 3: ( 1 sc, 1 inc) x3 (9)
Rnd 4-6: 9 sc (9) [3 rounds]
Rnd 7: ( 2 sc, 1 inc) x3 (12)
Rnd 8-9: 12 sc (12) [2 rounds]
Rnd 10: ( 3 sc, 1 inc) x3 (15)
Stuff the upper part of the base cone as you crochet. Make sure the stuffing is even and firm, as it will be harder to add later. Don’t stuff it all the way yet—we’ll finish stuffing after the base ring is complete.
Rnd 11-12: 15 sc (15) [2 rounds]
Rnd 13: (4 sc, 1 inc) x3 (18)
Rnd 14-15: 15 sc (15) [2 rounds]
Rnd 16: (5 sc, 1 inc) x3 (21)
Rnd 17-18: 21 sc (21) [2 rounds]
Rnd 19: (6 sc, 1 inc) x3 (24)
Rnd 20-21: 24 sc (24) [2 rounds]
Rnd 22: (7 sc, 1 inc) x3 (27)
Rnd 23-24: 27 sc (27) [2 rounds]
Rnd 25: (8 sc, 1 inc) x3 (30)
Rnd 26-27: 30 sc (30) [ 2 rounds]
Rnd 28: (9 sc, 1 inc) x3 (33)
Rnd 29-30: 33 sc (33) [2 rounds]
Rnd 31: (10 sc, 1 inc) x3 (36)
Rnd 32-33: 36 sc (36) [2 rounds]
Rnd 34: (11 sc, 1 inc) x3 (39)
Rnd 35-36: 39 sc (39) [2 rounds]
Rnd 37: (12 sc, 1 inc) x3 (42)
The next round is worked in BLO. Only the next round!
Rnd 38: 42 sc (42)
Rnd 39: 42 sc (42) FO.
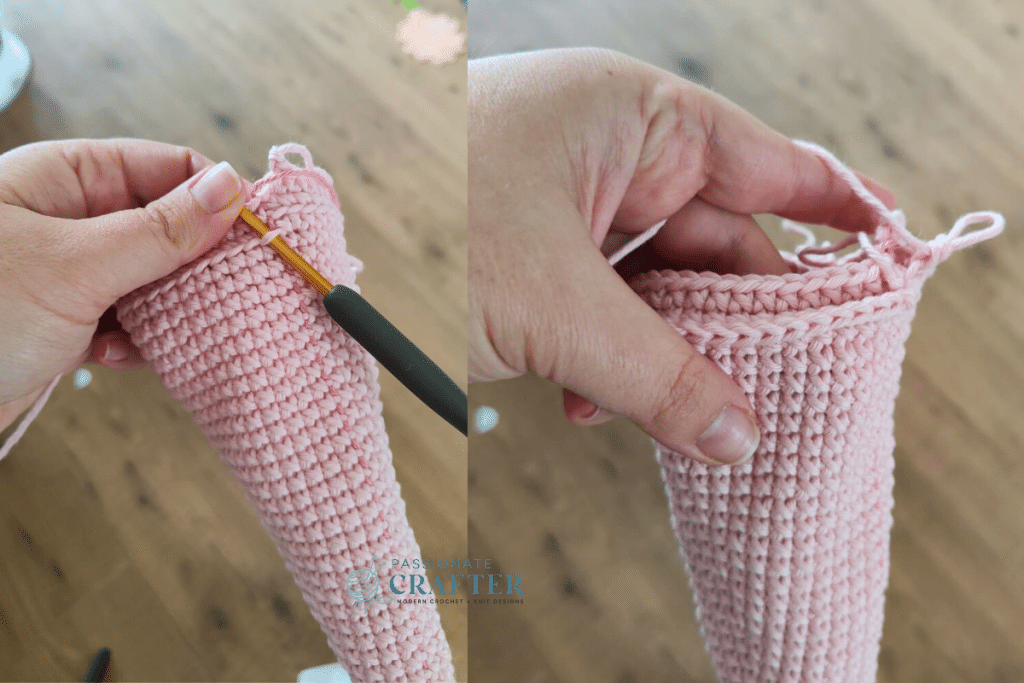
Base Ring
*with MC or any colour you wish
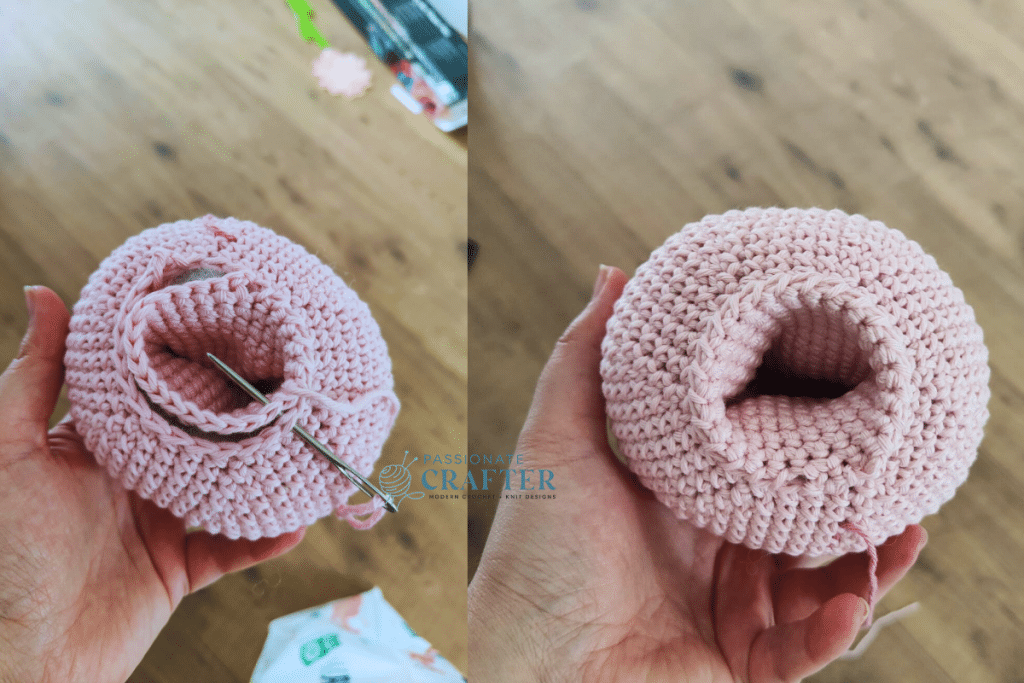
Rnd 1: Go back to the first st of round 38 (you will see the front loops) (see pic 1-2.). Insert your hook and pull a loop, ch 1, 1 sc in same st, 5 sc, 1 inc, (6 sc, 1 inc) x5 (48)
Rnd 2: (7 sc, 1 inc) x6 (54)
Rnd 3: (8 sc , 1 inc) x6 (60)
Rnd 4: (9 sc, 1 inc) x6 (66)
Rnd 5: (10 sc, 1 inc ) x6 (72)
Rnd 6-12: 72 sc (72) [7 rounds]
Rnd 13: (10 sc, 1 dec) x6 (66)
Rnd 14: (9 sc, 1 dec) x6 (60)
Rnd 15: (8 sc, 1 dec) x6 (54)
Rnd 16: (7 sc, 1 dec) x6 (48)
Rnd 17: (6 sc, 1 dec) x6 (42)
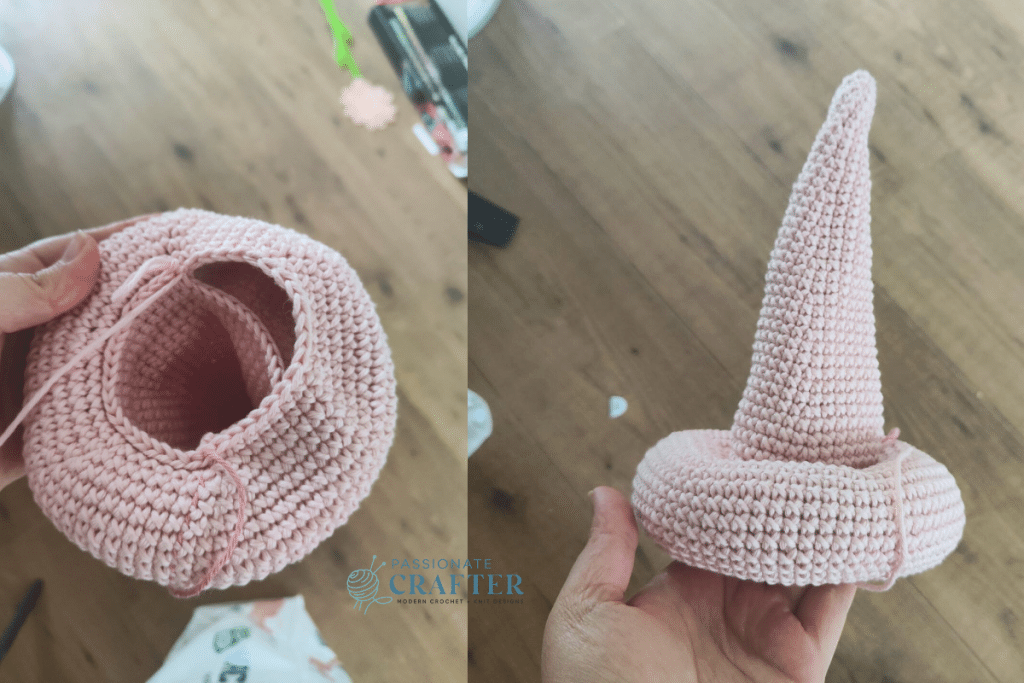
In the next round, we will close the base ring, connecting it with the last round of the base cone.
Rnd 18: Connect rnd 39 of base cone with rnd 17 of the base ring with 42 sc. Stuff the ring as you crochet along. (see pic 5-8). FO.
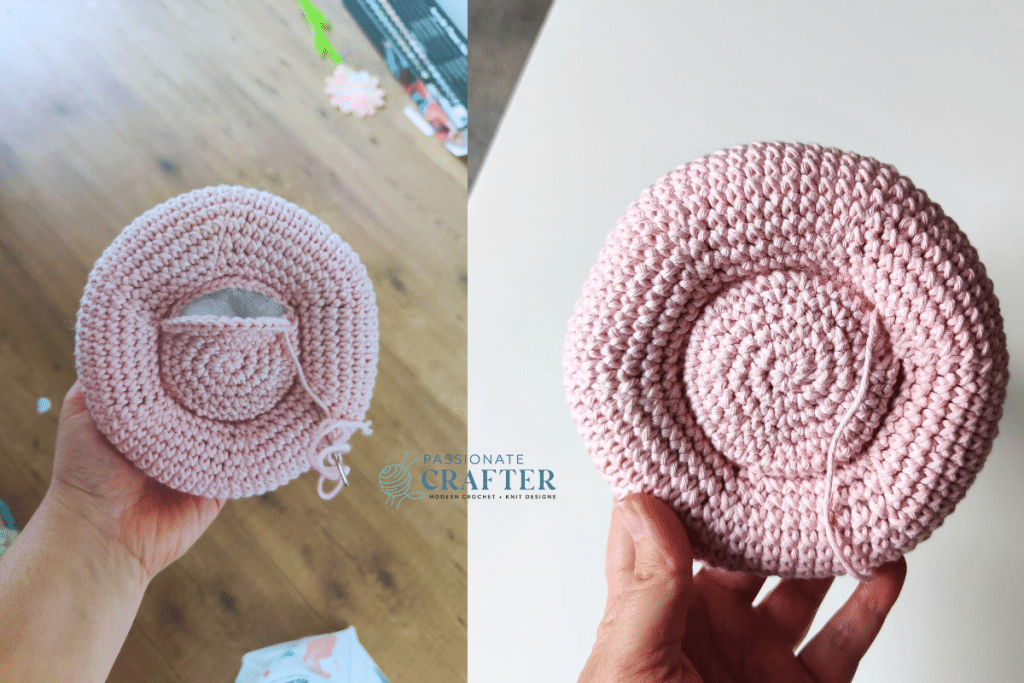
Base cone bottom circle
*with your MC or base ring colour (if you used different)
Rnd 1: MR of 8 sc (8)
Rnd 2: 8 inc (16)
Rnd 3: (1 sc, 1 inc) x8 (24)
Rnd 4: (1 sc, 1 inc, 1 sc) x8 (32)
Rnd 5: (2 sc, 1 inc) x10, 2 sc (42) FO. Leave a longer tail for sewing.
Now fully stuff the cone, then take the base circle. Use a tapestry needle to sew the circle to the bottom of the cone to close it.
Stacking Pig Toy Foot x4
*with dark pink
Rnd 1: MR of 8 sc (8)
Rnd 2: 8 inc (16)
Rnd 3: (1 sc, 1 inc ) x8 (24)
The next round is worked in BLO. Only the next round!
Rnd 4:24 sc (24)
Rnd 5: 24 sc (24)
Color Change to main color (MC)
Rnd 6: (2 sc, 1 dec) x6 (18)
Rnd 7-9: 18 sc (18) [3 rounds]
Stuff the feet well but don’t overdo it.
Rnd 10: (1 sc, 1 dec) x6 (12)
Rnd 11-12: 12 sc (12) [2 rounds]
Flatten the opening of the piece. Ch 1 and crochet 6 sc through both sides FO. Leave a long yarn tail for sewing.
Making toes
To create the toes, use a tapestry needle and a piece of dark pink yarn. Insert the needle at the bottom center of the foot and bring it out toward the front of the foot, forming a straight line. Repeat this stitch a few times in the same spot, then gently pull the yarn to tighten. This will create a slight indentation, giving the appearance of two separate toes, just like a little piggy’s foot.
Large ring
*with any colour you wish
Rnd 1: ch 43, sc in 2nd from hook, 5 sc, 1 inc, (6 sc, 1 inc) x5, sl.st to join and form a ring (48)
Rnd 2: (7 sc, 1 inc) x6 (54)
Rnd 3: (8 sc , 1 inc) x6 (60)
Rnd 4: (9 sc, 1 inc) x6 (66)
Rnd 5-10: 66 sc (66) [6 rounds]
Rnd 11: (9 sc, 1 dec) x6 (60)
Rnd 12: (8 sc, 1 dec) x6 (54)
Rnd 13: (7 sc, 1 dec) x6 (48)
Rnd 14: (6 sc, 1 dec) x6 (42)
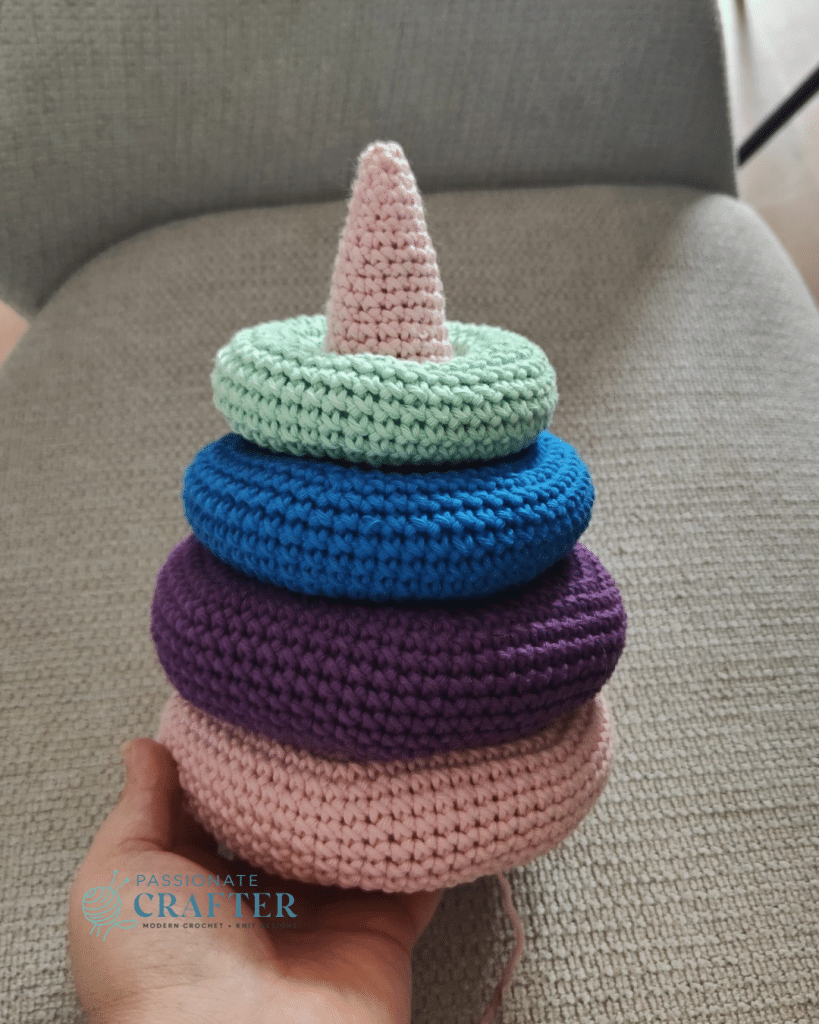
FO and leave a long tail for sewing. Using a tapestry needle, sew Round 1 to Round 14 to close the ring, stuffing it gradually as you go.
Once the ring is fully closed, gently shape it with your hands and slightly loosen the center opening by pulling on it.
Middle ring
*with any colour you wish (I used blue)
Rnd 1: ch 37, sc in 2nd from hook, 4 sc, 1 inc, (5 sc, 1 inc) x5, sl.st to join and form a ring (42)
Rnd 2: (6 sc, 1 inc) x6 (48)
Rnd 3: (7 sc , 1 inc) x6 (54)
Rnd 4: (8 sc, 1 inc) x6 (60)
Rnd 5-10: 60 sc (60) [6 rounds]
Rnd 11: (8 sc, 1 dec) x6 (54)
Rnd 12: (7 sc, 1 dec) x6 (48)
Rnd 13: (6 sc, 1 dec) x6 (42)
Rnd 14: (5 sc, 1 dec) x6 (36)
FO and leave a long tail for sewing. Using a tapestry needle, sew Round 1 to Round 14 to close the ring, stuffing it gradually as you go.
Once the ring is fully closed, gently shape it with your hands and slightly loosen the center opening by pulling on it.
Small ring
*with any colour you wish (I used mint)
Rnd 1: ch 31, sc in 2nd from hook, 3 sc, 1 inc, (4 sc, 1 inc) x5, sl.st to join and form a ring (36)
Rnd 2: (5 sc, 1 inc) x6 (42)
Rnd 3: (6 sc , 1 inc) x6 (48)
Rnd 4-9: 48 sc (48) [6 rounds]
Rnd 10: (6 sc, 1 dec) x6 (42)
Rnd 11: (5 sc, 1 dec) x6 (36)
Rnd 12: (4 sc, 1 dec) x6 (30)
FO and leave a long tail for sewing. Using a tapestry needle, sew Round 1 to Round 12 to close the ring, stuffing it gradually as you go.
Once the ring is fully closed, gently shape it with your hands and slightly loosen the center opening by pulling on it.
Stacking Pig Toy Head
*with your MC
Rnd 1: MR of 8 sc (8)
Rnd 2: 8 inc (16)
Rnd 3: (1 sc , 1 inc) x8 (24)
Rnd 4: 24 sc (24)
Rnd 5: (2 sc, 1 inc) x8 (32)
Rnd 6: 5 sc, 4 inc, 12 sc, 4 inc, 7 sc (40)
Rnd 7: 40 sc (40)
Rnd 8: 5 sc, (1 sc, 1 inc) x4, 12 sc, (1 sc, 1 inc) x4, 7 sc (48)
Rnd 9-10: 48 sc (48) [2 rounds]
Take a stitch marker and mark the 22 st and 29th st of next rnd. we will place the eyes in these sts later.
Rnd 11: (7 sc, 1 inc) x6 (54)
Insert the safety eyes in the marked sts of rnd 11.
Rnd 12-20: 54 sc (54) [9 rounds]
Rnd 21: (7 sc, 1 dec) x6 (48)
Rnd 22: (6 sc, 1 dec) x6 (42)
Rnd 23: (5 sc, 1 dec) x6 (36)
Rnd 24: (4 sc, 1 dec) x6 (30)
Rnd 25: (3 sc, 1 dec) x6 (24) FO. Don’t leave longer tail.
Small cone for piggy’s head
*with your MC
Rnd 1: MR of 6 sc (6)
Rnd 2: 6 inc (12)
Rnd 3: (1 sc , 1 inc) x6 (18)
Rnd 4-8: 18 sc (18) [5 rounds]
Rnd 9: (2 sc, 1 inc) x6 (24)
Rnd 10-18: 24 sc (24) [9 rounds]
FO and leave a long tail for sewing.
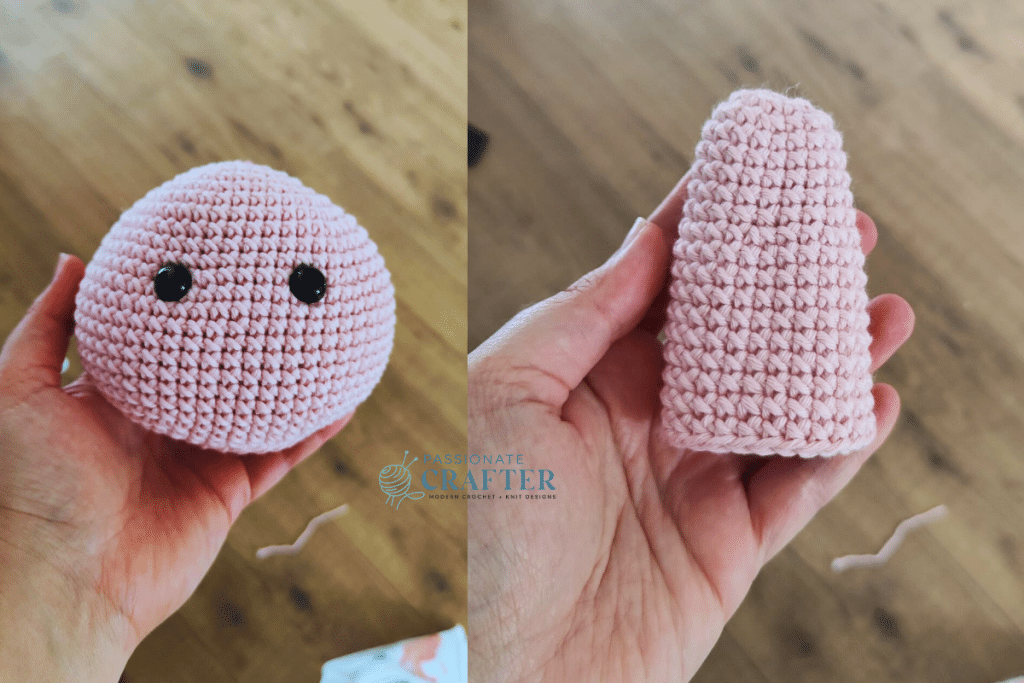
Stuff the head firmly, but leave the middle empty.
Insert the cone into the empty center of the head, lining up the stitches.
Then, use a tapestry needle to sew the cone and head together.
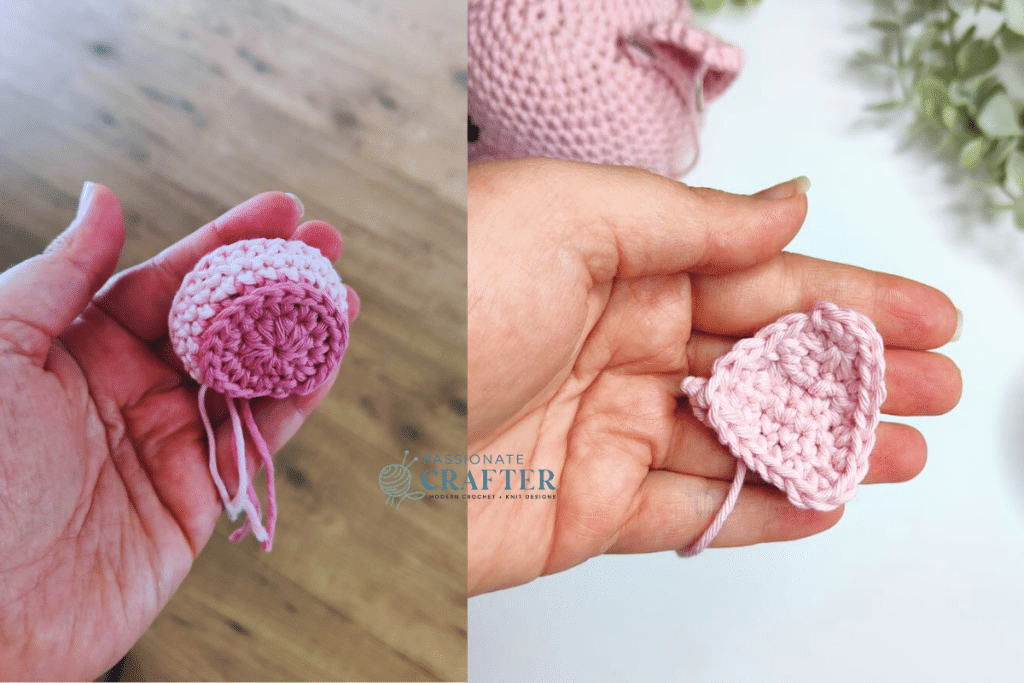
Stacking Pig Toy Muzzle
*with dark pink
Rnd 1: MR of 10 hdc (10)
Rnd 2: 10 hdcinc (20)
CC to MC
In the next round we will work in the 3rd loop of hdc st, see amigurumi tips on page 3 or work in BLO.
Rnd 3: (3 sc , 1 inc) x5 (25)
Rnd 4-5: 25 sc (25) FO. Leave longer tail for sewing.
Stacking Pig Toy Ears x2
*with your MC
Leave longer tail when starting your chains. we will use this tail for sewing.
Row 1: Ch 8, 7 sc across (7)
Row 2-3: ch 1, turn, 7 sc (7)
Row 4: ch 1, turn, 1 dec, 3 sc, 1 dec (5)
Row 5: ch 1, turn, 5 sc (5)
Row 6: ch 1, turn, 1 dec, 1 sc, 1 dec (3)
Row 7: ch 1, sc3tog (1)
Now we’ll crochet a round of single crochet (sc) around the ear.
Make 1 sc in each stitch, and when you reach a corner, crochet 3 sc into the same stitch to help the ear lay flat and keep its shape.
When you’ve worked all the way around, slip stitch to the first stitch to join.
Fasten off, and you don’t need to leave a long yarn tail.
Head Assembly
Sew on the Muzzle:
Place the muzzle in the center, just below the eyes, and sew it to the head.
Be careful not to sew through the inner cone.
Attach the Ears:
Pin the ears to each side of the head using safety pins.
Once you’re happy with the placement, sew them on.
Piggy’s Assembly
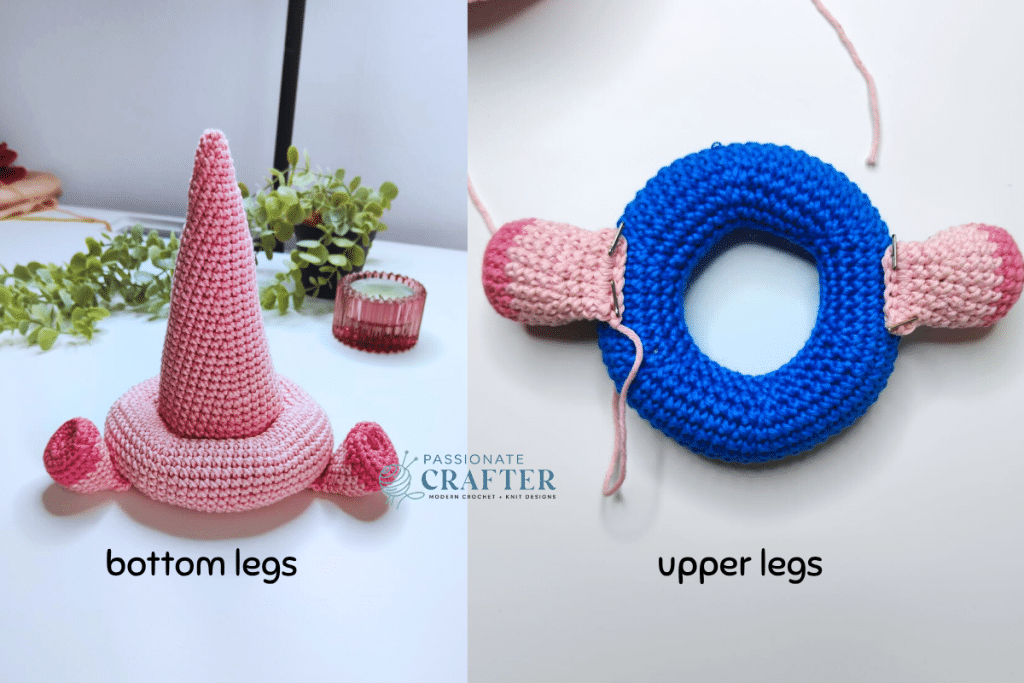
Attach the bottom Legs:
Take two feet and the base cone with the ring attached.
Place the feet on opposite sides of the bottom of the ring, leaving about 15–20 stitches between them. Use safety pins to hold them in place.
I sewed mine around Round 14 of the ring.
Thread a tapestry needle with the yarn tail from each foot and sew them securely to the ring.
Attach the upper Legs:
Take two feet and the middle ring.
Place the feet on opposite sides of the bottom of the ring. Use safety pins to hold them in place.
I sewed mine around Round 11 of the ring.
Thread a tapestry needle with the yarn tail from each foot and sew them securely to the ring.
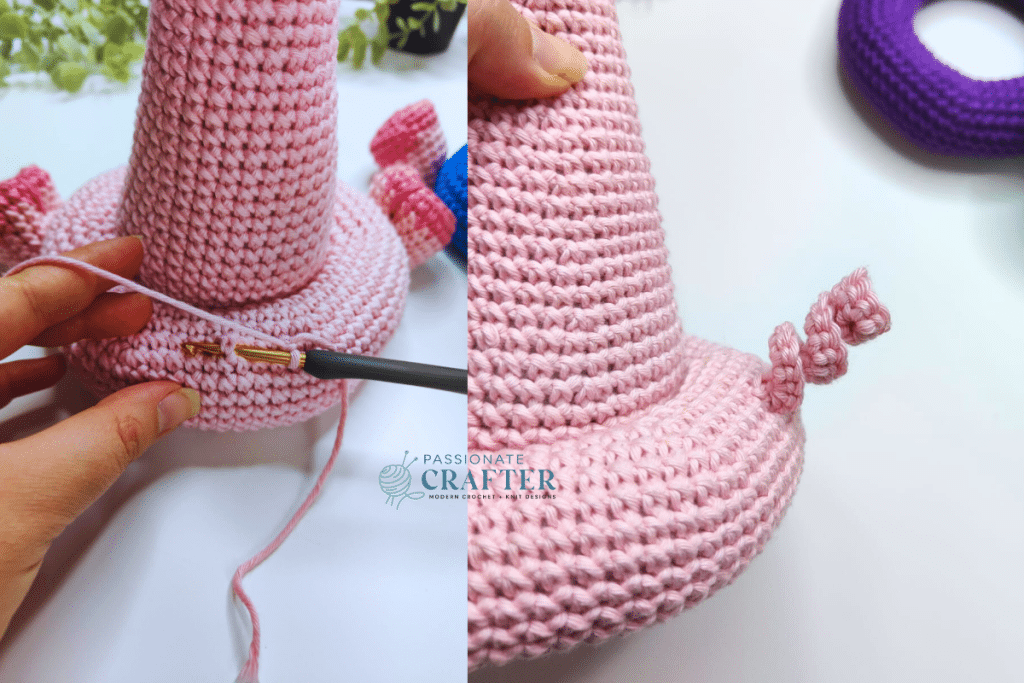
Stacking Pig Toy Tail
Make the Tail:
Take the base cone with the ring already attached.
Find the center stitch between the two legs and insert your hook there.
- Pull up a loop and chain 15.
- Starting in the 2nd chain from your hook, crochet the tail by alternating:
- 2 single crochets (sc) in the first chain
- then 3 sc in the next
- and repeat this pattern all the way across.
Once you finish the tail, join it to the ring with a slip stitch at the base of your starting chain.
Final Thoughts
The Stacking Pig Toy is a great project for anyone who enjoys making useful and playful items. It’s simple enough for most crocheters to follow, but still interesting thanks to the layering and assembly. Best of all, it’s not just cute—it also supports early learning and development for small children. Whether you’re making it as a gift or for your own family, this toy is a fun and rewarding make that kids will enjoy stacking, hugging, and playing with again and again.
Don’t Forget to Share!
If you love this pattern, please consider pinning it to your crochet board on Pinterest, or sharing it with your crochet group or friends. It really helps support the blog and keeps free patterns like this coming your way.
Find this post helpful?
Share it on Pinterest
You can also tag me on social media @passionate.crafter or use the hashtag #passionatecrafterr so I can see your beautiful versions and maybe even feature them!

More free amigurumi patterns you will love:


Save this tutorial to your Pinterest boards so that you can come back to it later.
We’d love to hear your feedback. Drop a comment below and tell us your thoughts! And don’t forget to follow us on your favorite social platform!
Invitation to our Facebook group
You are welcome to share your projects made by our patterns with the community and us. Moreover, we are thrilled to see your creations, and you are very welcome to share them on our FACEBOOK PAGE HERE or our FACEBOOK GROUP or on INSTAGRAM by using the hashtag #passionatecrafterr.