Have you ever fallen in love with a granny square project, only to feel overwhelmed by the thought of sewing everything together? You’re not alone! But what if I told you there’s a faster, easier, and more seamless way to join your squares as you crochet? The Join-As-You-Go (JAYG) is a game-changing technique that saves time, uses less yarn, and creates a flexible, decorative join without the hassle of sewing.

Many crocheters shy away from motif-based patterns simply because traditional joining methods can be tedious and time-consuming.
But once you master the join as you go granny square method, you’ll never look at granny squares the same way again. Whether you’re working on your first solid granny square project or looking for a stress-free way to connect motifs, this technique will open up a whole new world of possibilities. So grab your hook and yarn, and let’s dive into this simple yet brilliant joining method—you’ll wonder how you ever crocheted without it!
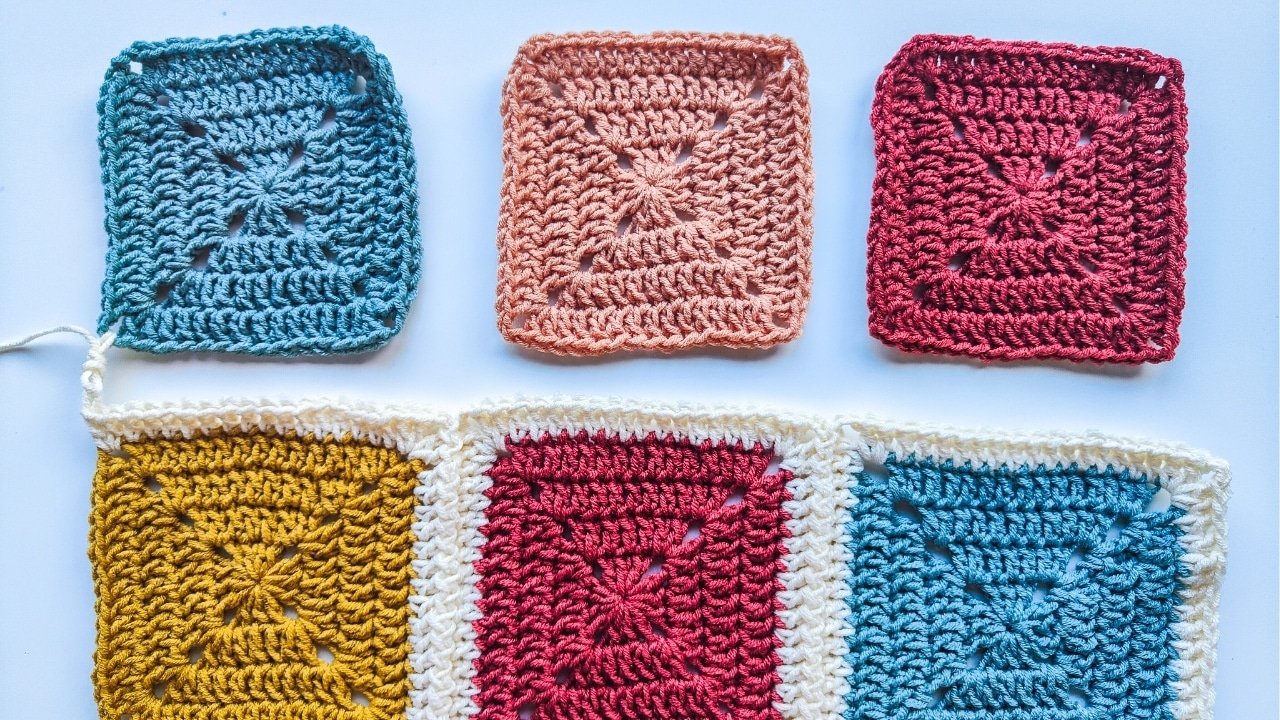
What Is Join As You Go (JAYG)?
The Join-As-You-Go (JAYG) method is a game-changer for anyone who loves crocheting granny squares. Instead of crocheting all your squares separately and then sewing them together, JAYGO allows you to connect the squares as you go. This technique not only simplifies the joining process but also provides a smooth and seamless finish, especially when working with solid granny squares.
One of the standout benefits of JAYGO is its efficiency. Joining the squares during the final round significantly reduces the number of tails to weave in, making the finishing process quicker and less tedious. This is particularly advantageous for larger projects like blankets or shawls, where the traditional method of joining can be incredibly time-consuming.
Additionally, JAYGO is a yarn saver. Traditional methods often result in leftover yarn scraps that can’t be used for much else. With JAYGO, you use just the right amount of yarn for each join.
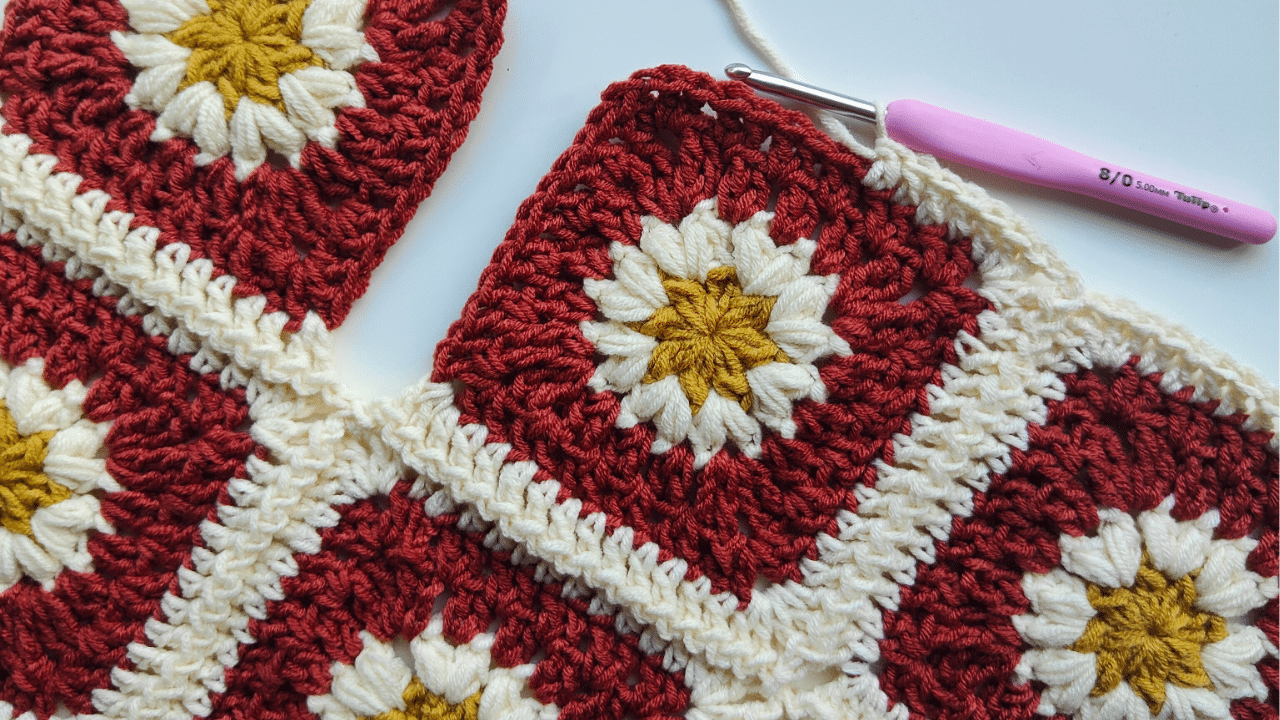
The zig zag slip stitch JAYGO
In this guide, I will walk you through the Join-As-You-Go (JAYG) method, specifically using the Zig-Zag Slip Stitch technique—a simple yet effective way to join granny squares seamlessly while adding a decorative touch.
By the end of this tutorial, you’ll have a clear understanding of how to use this technique to effortlessly join your granny squares while achieving a beautiful, textured finish. Whether you’re working on a cozy blanket, a stylish bag, or a home décor piece, this method will elevate your crochet projects and make the joining process feel like a natural, enjoyable part of your creative journey. Let’s get started and transform the way you join motifs forever!
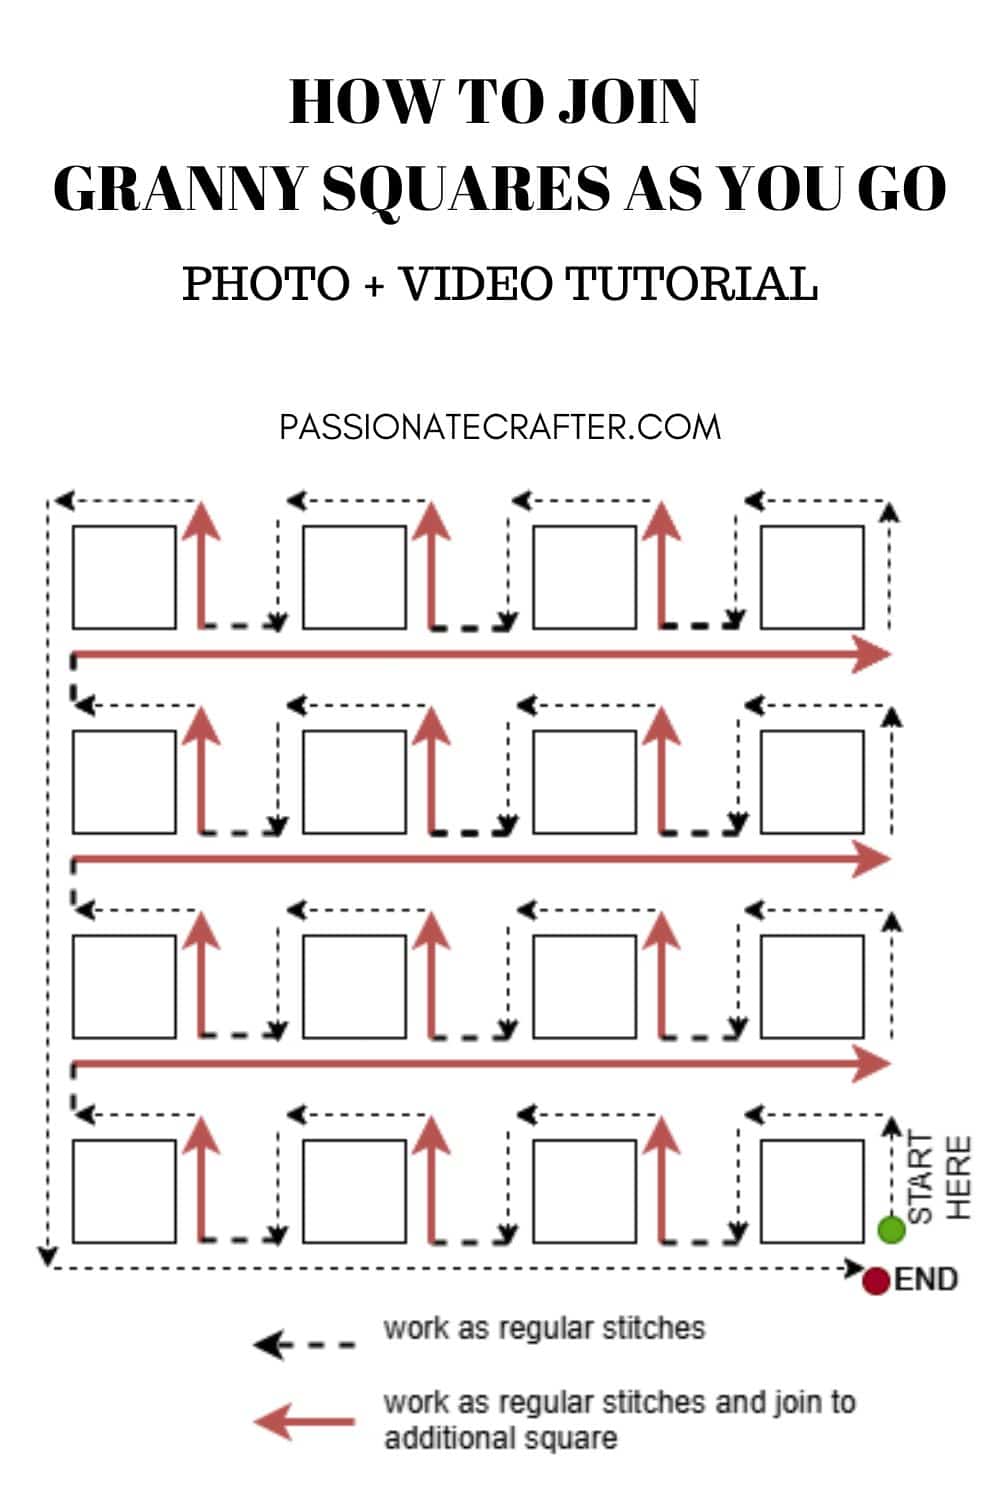
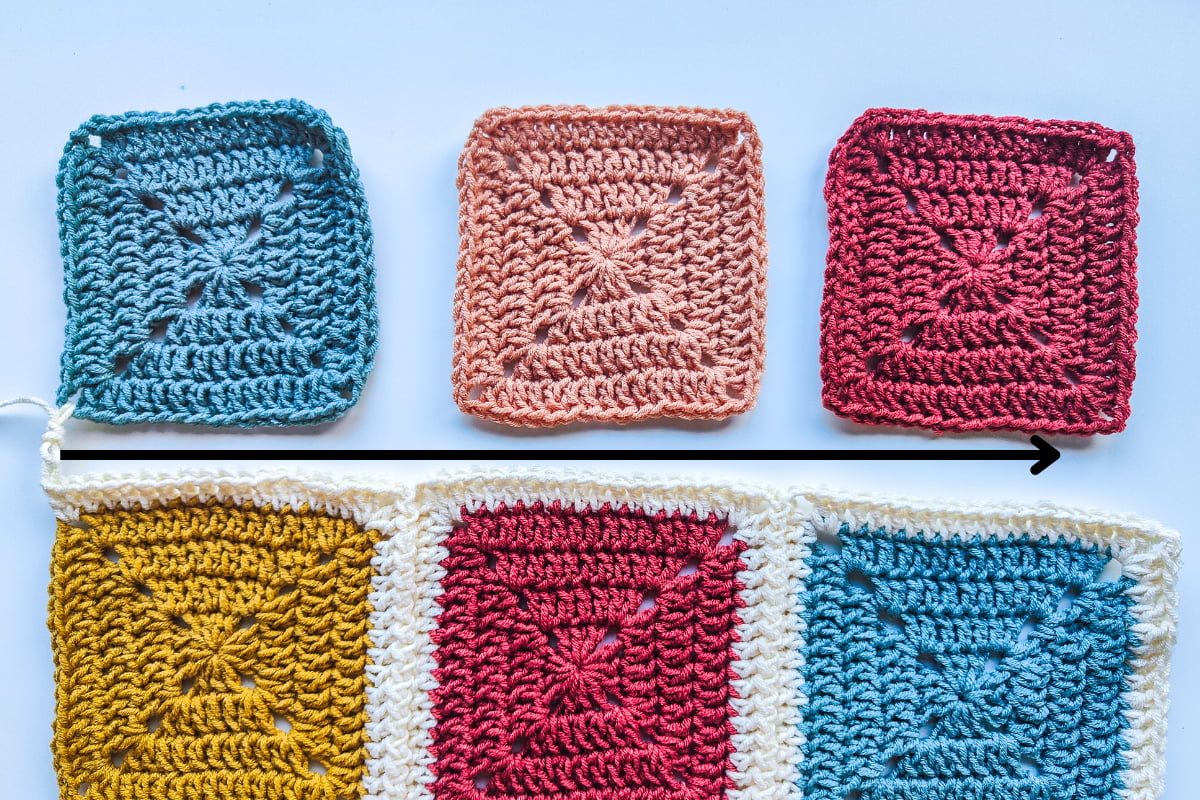
In the picture down below, you can see working direction for the joining.
Abbreviation
st(s)- stitch(es)
ch(s)- chain(s)
sk- skip
rep- repeat
sp- space
dc join- see special stitch section
sl st- slip stitch
Materials
I used 5 mm crochet hook
Lion Brand Color Theory yarn
You can use any yarn you have in your stash and any hook size appropriate for the yarn used.
Video Tutorial
For all the visual learners, check the step-by-step video tutorial down below. I explain each step of the joining process.
Step-by-step join as you go granny square method
Arrange all the granny squares as desired. (The rows and the columns can include any number of squares. For this guide I will use 12 squares; 3 squares per row and 3 columns in total)
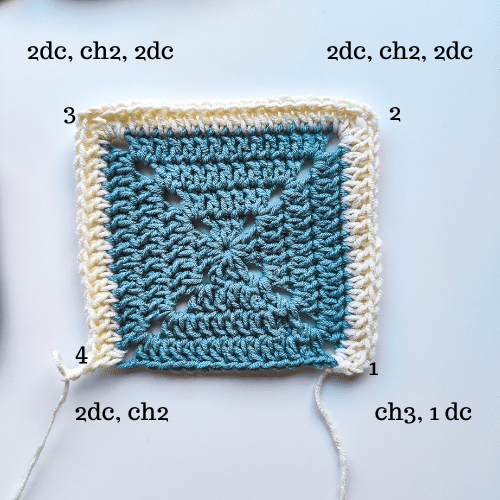
First Corner: Insert your hook in the bottom right corner of your first square, ch3 (counts as 1st dc), 1 dc in same sp,
Along the Next Three Sides: Work 1 dc in each stitch till you reach the corner
In the Second and Third Corners: Work [2 dc, ch 2, 2 dc] into the corner space.
In the Fourth Corner: Work 2 dc, ch 2, then prepare to join the next granny square.
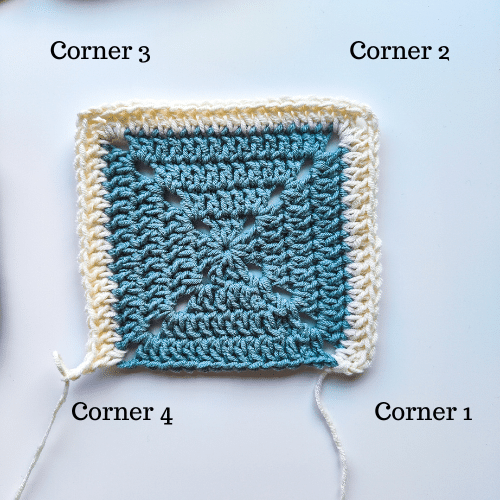
Pics below shows the corners and the stitch sequence you have to work into them.
Attaching second granny square
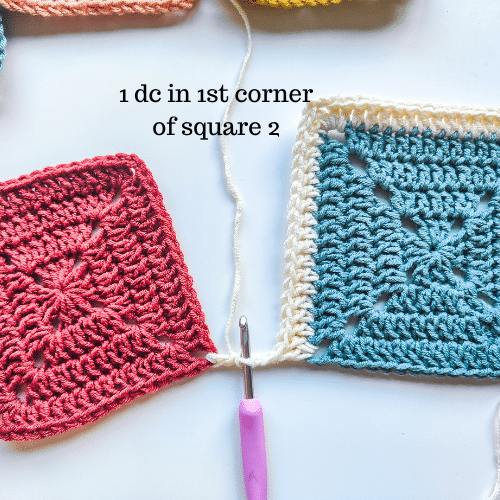
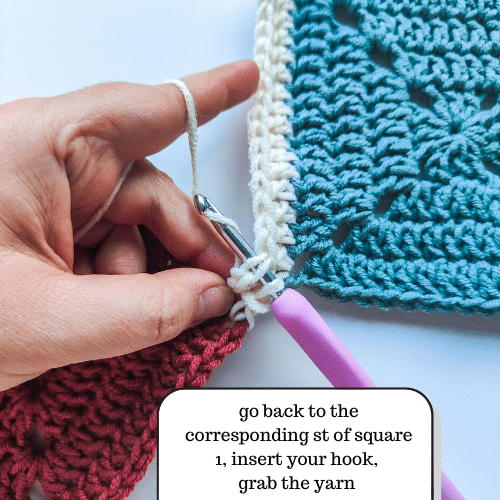
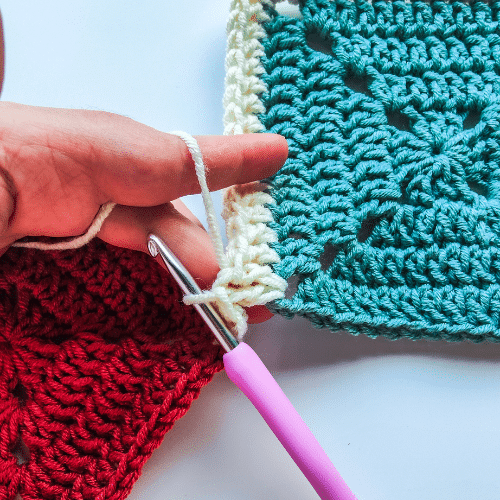
Special stitch: dc join– work 1 dc in next square, with the working yarn under your hook, go back to the previous square and insert your hook to the corresponding stitch, grab the yarn and pull through. See pics below
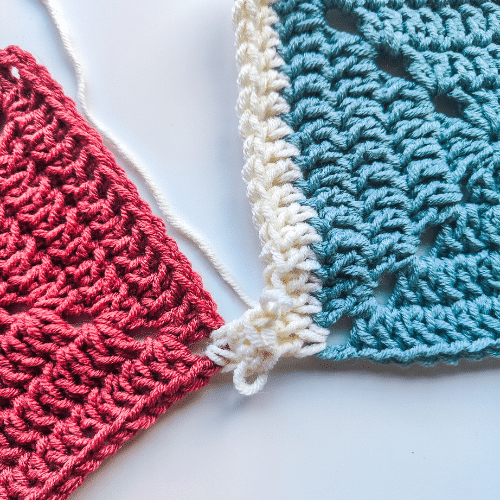
First Corner: Work 2 dc join sts
Along First side of Square 2: Work 1 dc join in next 15 sts,
Second Corner: Work 2 dc join, ch2, 2 dc in same corner
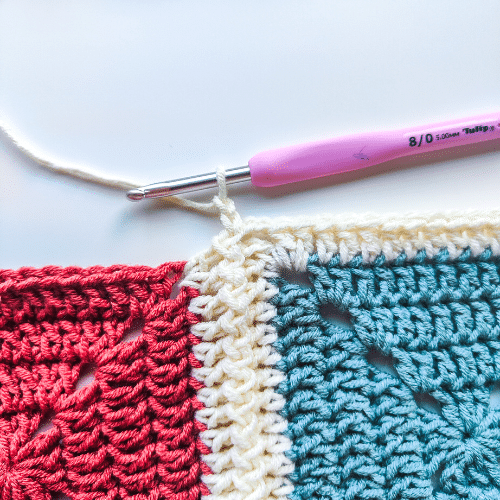
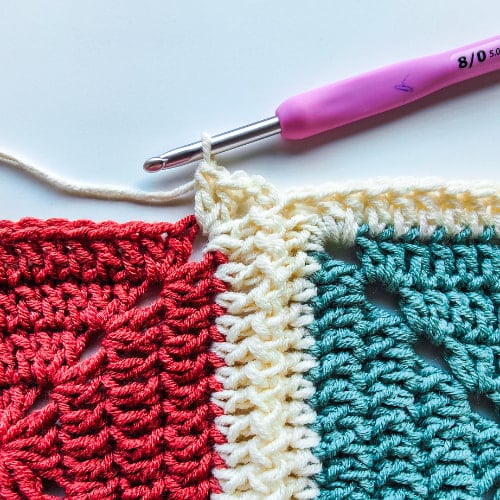
Second and Third Sides: Work 1 dc in each st till the corner
Third Corner: 2 dc, ch2, 2dc in the corner space
Fourth Corner: 2 dc, ch2
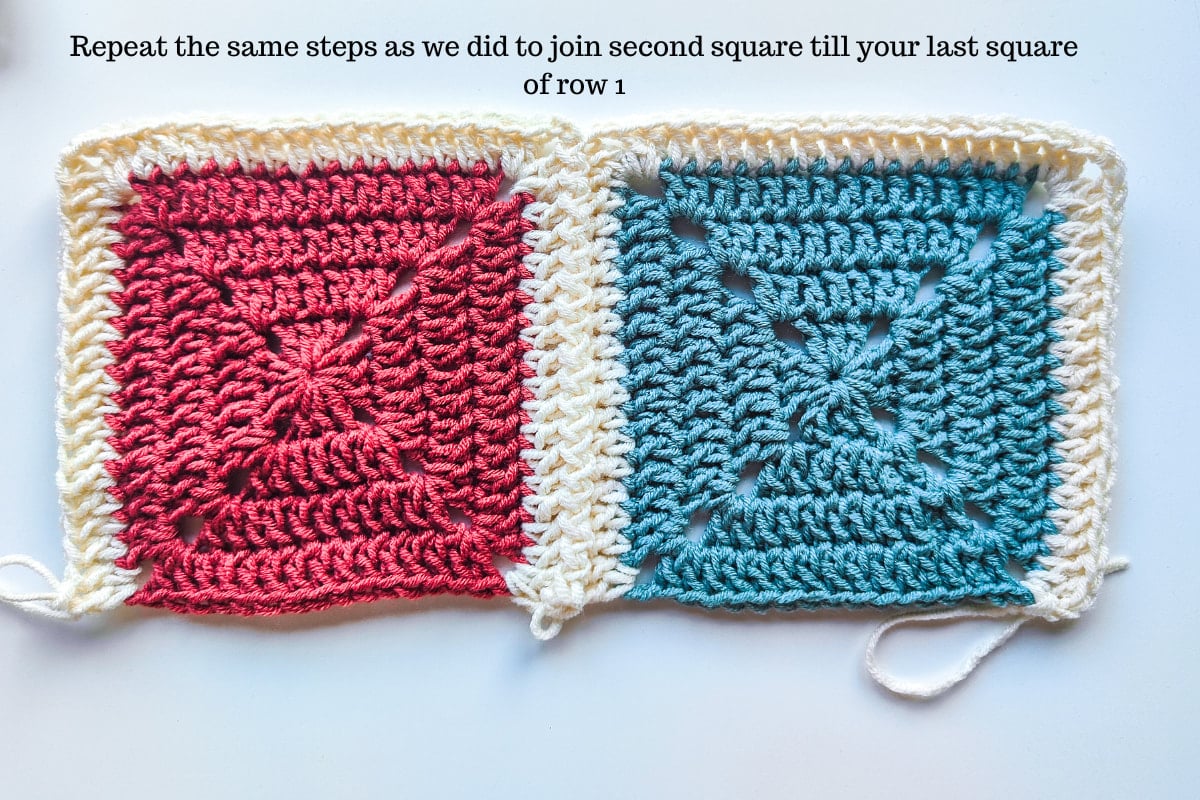
Continue joining the remaining squares in the first row using the same process. When you reach the last square of the row, stop after completing the second side, just before reaching the third corner—leaving two sides unworked.
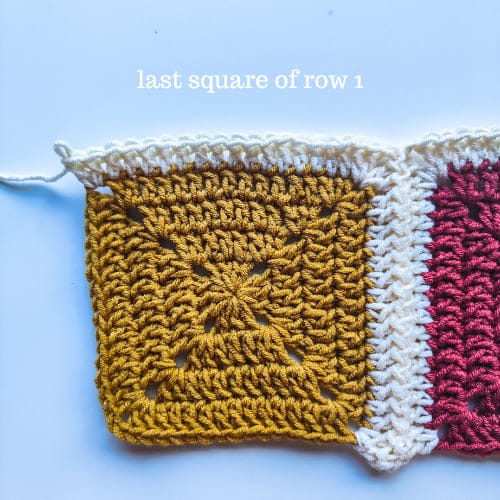
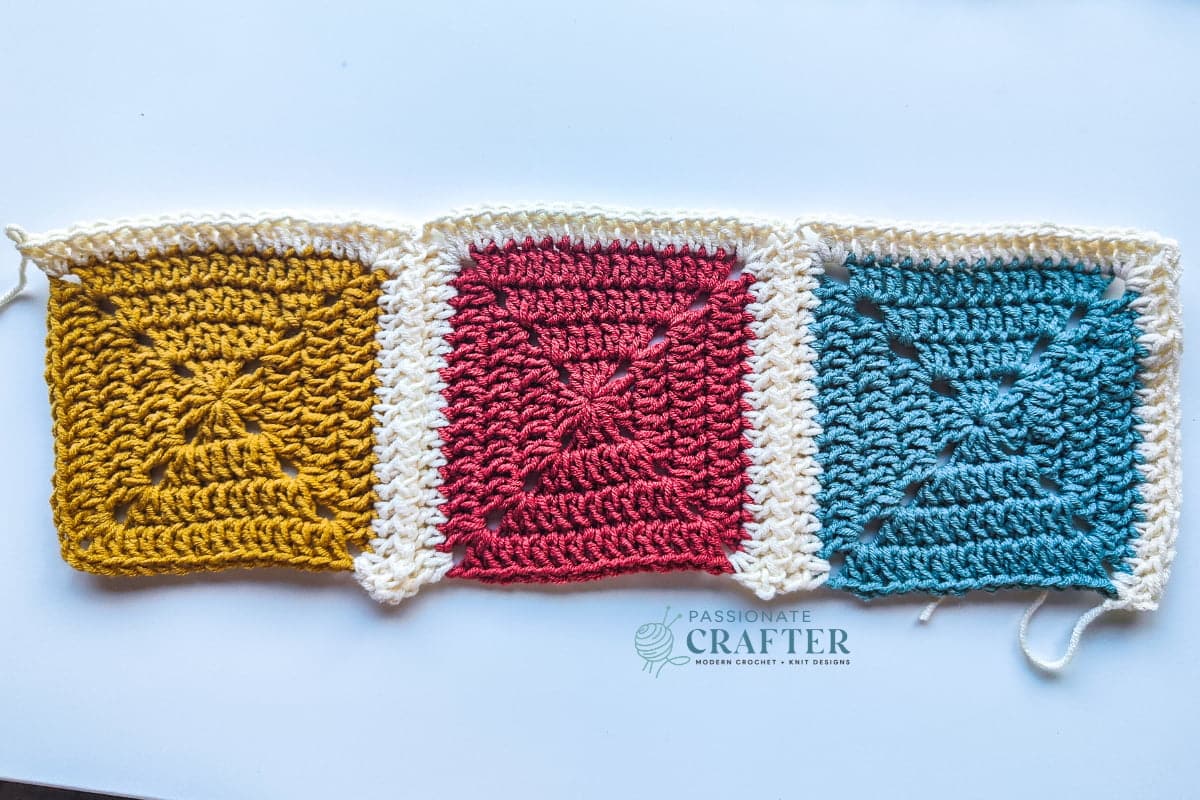
Third Corner of the Last Square: 2 dc, ch2
Now grab the next granny squares.
Joining Second Row of Granny Squares
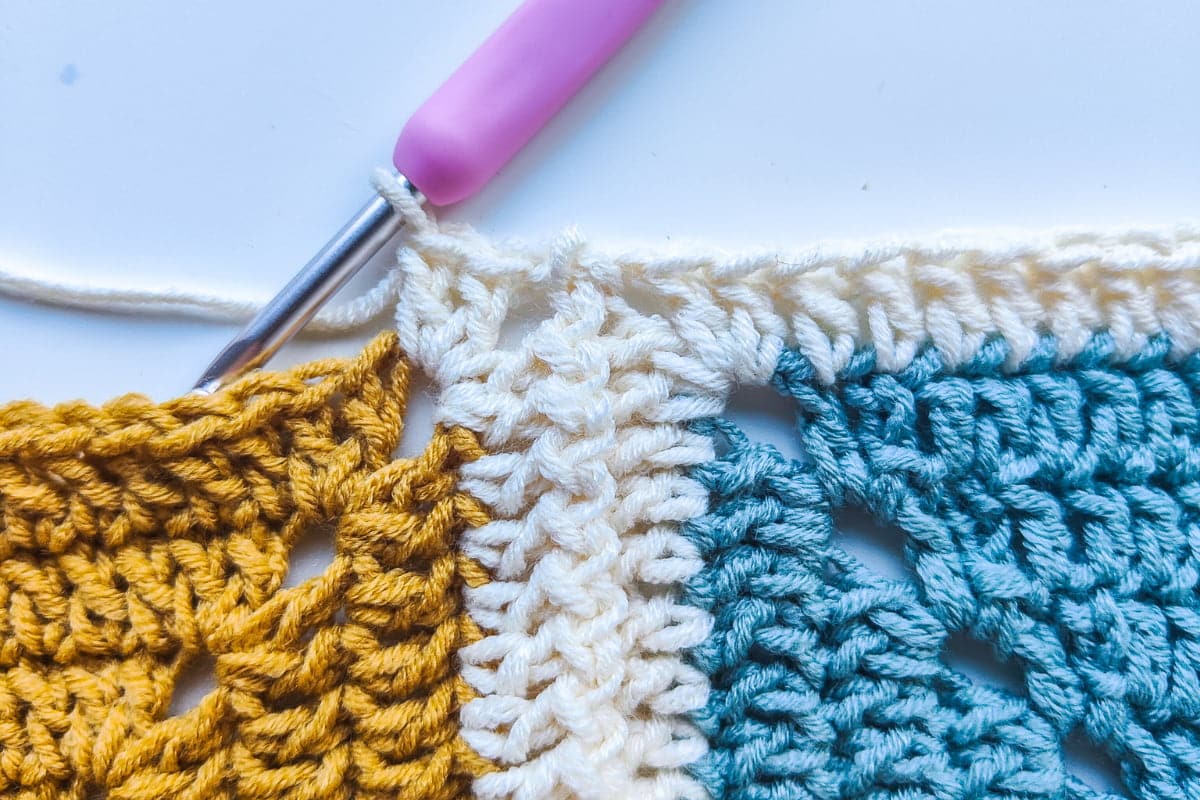
For row 2 and each additional row we will join the squares only horizontally ( the upper part of squares from row 1 and the bottom part of squares of row 2). See pic below.
First side of first square: 2 dc join in first corner, *** 1 dc join in next 15 sts, 2 dc join in second corner
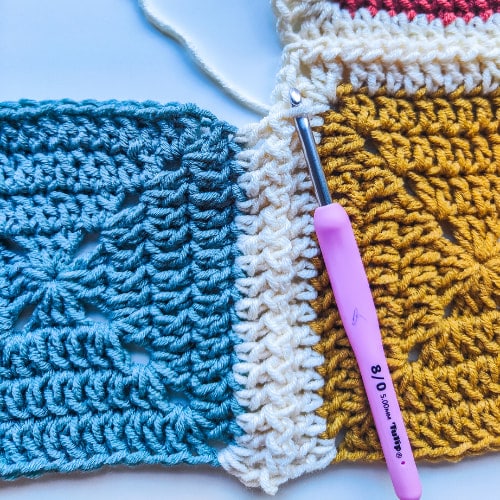
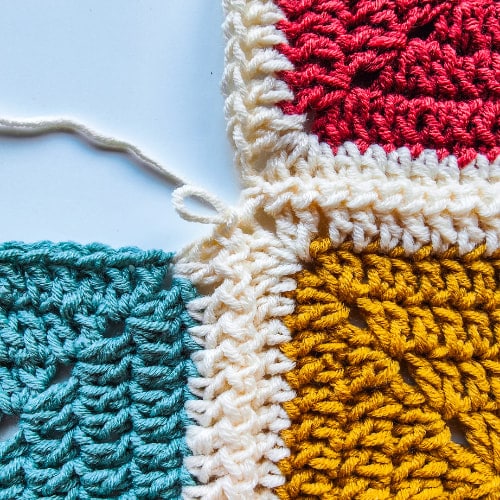
Corner Join
ch1, sk the corner of the same square of row 1 and sl st into the corner of next square of row 1, ch1, attach the next square and work 2 dc join sts into the corner***
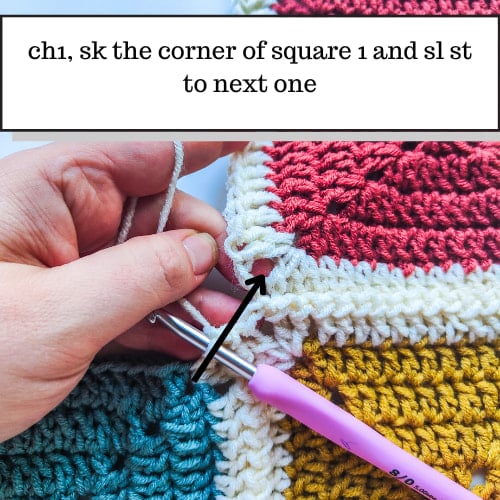
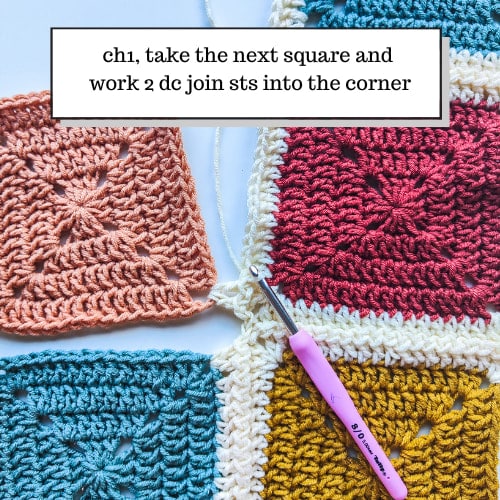
Continue adding squares by repeating the steps in the *** till your last square.
Last Corner of Row 2: ch1, sl st in the corner of the last square of row 1, ch1, 2 dc in same corner.
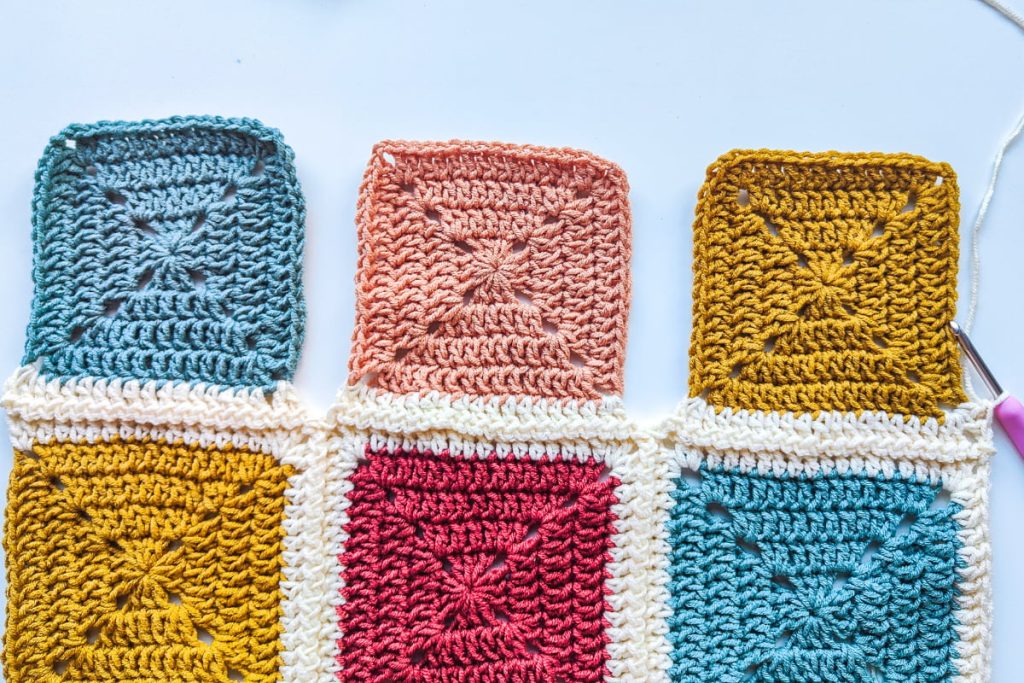
Row 3 How to continue to join the squares
Basically row 3 is the same as row 1. Here we will work all the 3 sides of the squares and will join the corners in the middle. For the last square of this row again we will leave it with 2 sides unworked. But Here are the steps for you one more time.
Along the Next Three Sides: Work 1 dc in each stitch till you reach the corner
In the Second and Third Corners: Work [2 dc, ch 2, 2 dc] into the corner space.
In the Fourth Corner: Work 2 dc, ch 1, then sl st into the corner of square 2 of row 1.
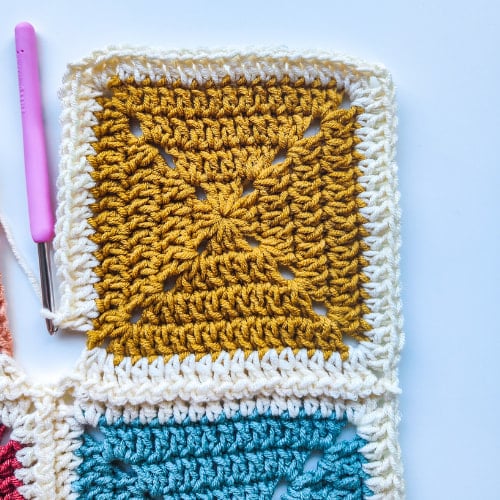
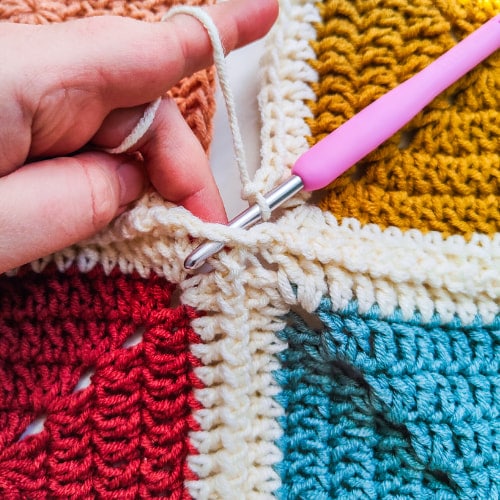
For the next remaining squares till you reach your last square
First Corner: Work 2 dc join sts
Along First side of Square 2: Work 1 dc join in next 15 sts,
Second Corner: Work 2 dc join, ch2, 2 dc in same corner
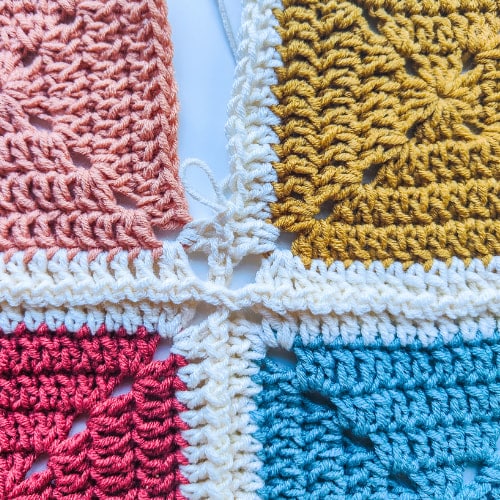
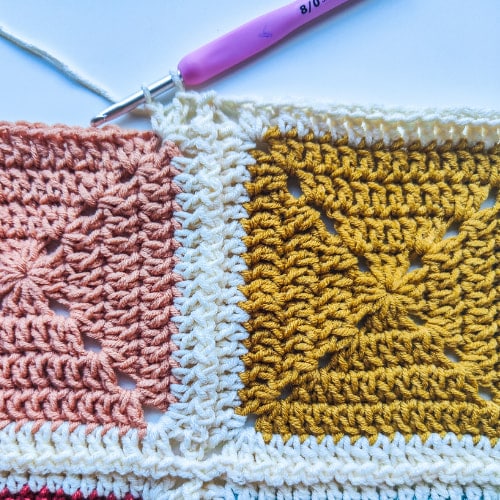
Second and Third Sides: Work 1 dc in each st till the corner
Third Corner: 2 dc, ch2, 2dc in the corner space
Fourth Corner: 2 dc, ch1, sl st in next granny square corner of prev row.
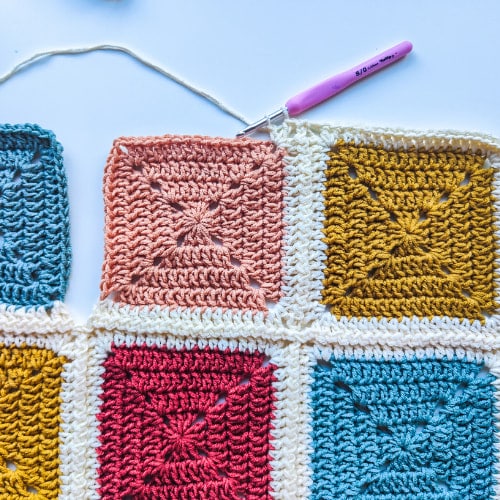
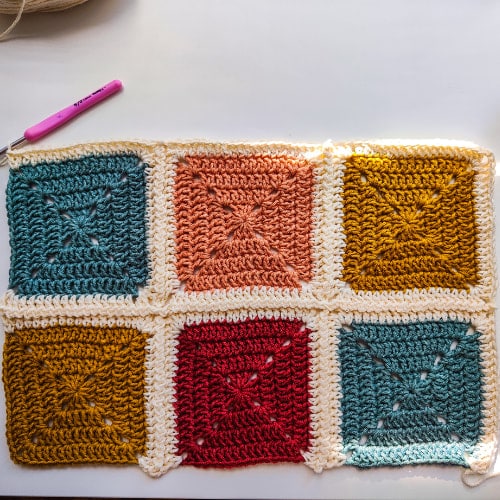
Continue joining the remaining squares in row 3 using the same process. When you reach the last square of the row, stop after completing the second side, just before reaching the third corner—leaving two sides unworked.
Now you will continue repeating the steps from Row 2 and row 3 until you join all the squares. You will end joining the squares with row 3. At the end you will have 2 sides unworked( The bottom and the left side of your project ).
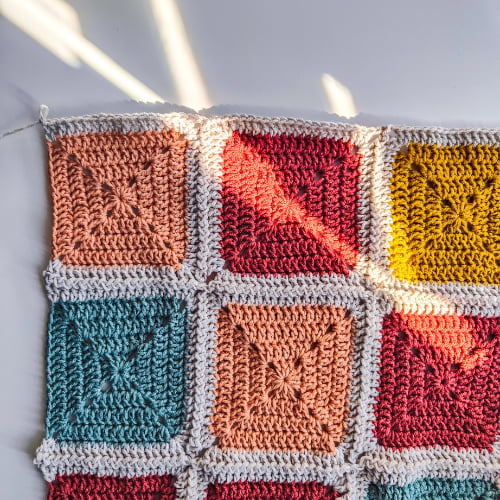
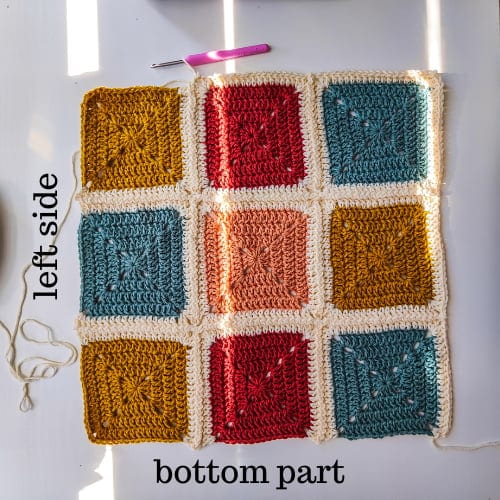
Finishing the unworked sides
Corner space: ch2, 2 dc in same corner space
Left unworked side: 1 dc in next 15 sts, * 2dc in next corner sp, ch2, sl st in the joining line, ch2, 2 dc in next corner sp, 1 dc in next 15 sts * rep until the corner sp of your last square of this unworked side,
Next corner: 2dc, ch2, 2 dc all in next corner,
Bottom side ( unworked ): 1 dc in next 15 sts, * 2dc in next corner sp, ch2, sl st into the joining line, ch2, 2 dc in next corner, 1 dc in next 15 sts * rep until you reach the last corner ( which is the starting point ) 2dc, ch2 sl st on top of first st.
I hope you enjoyed this tutorial and it will be helpful for your next granny square project.
Don’t forget to pin this for later!
More granny square patterns to try
For more granny square inspiration check the latest free granny square patterns.


Save this tutorial to your Pinterest boards so that you can come back to it later.
We’d love to hear your feedback. Drop a comment below and tell us your thoughts! And don’t forget to follow us on your favorite social platform!
Invitation to our Facebook group
You are welcome to share your projects made by our patterns with the community and us. Moreover, we are thrilled to see your creations, and you are very welcome to share them on our FACEBOOK PAGE HERE or our FACEBOOK GROUP or on INSTAGRAM by using the hashtag #passionatecrafterr.